How to manufacture the T Bar is a question which frequently comes up.
The various options are
Make T-Bar from plates. (Involves welding plates together)
Cut from UB. (Might include wastage)
Buy Standard T-Bar. (May have its own constraints like minimum quantities)
Up until now we were detailing T bars as fabricated using T Plates. But now one of our clients has given a catalog from GALINTEL. Click on this link to go to their website.
Now whether a T bar should be option 1, 2 or 3 should a matter of preference of the fabricator irrespective of what is specified on the member schedule. Best course of actions is to RFI.
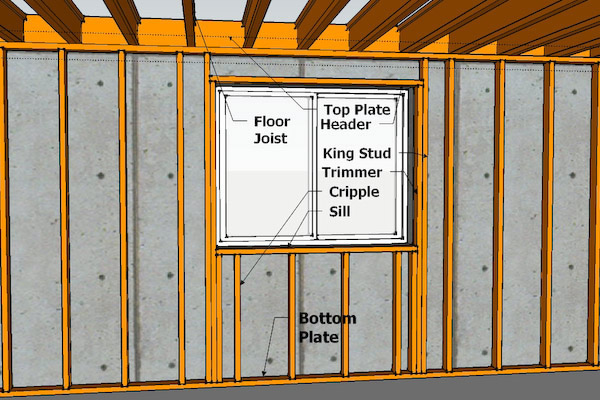
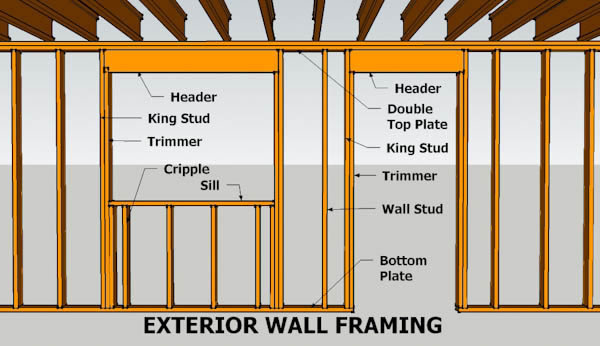
A single top plate can decrease lumber use and boost energy efficiency, but less lumber also decreases the bearing capacity of the top of the wall. … The tolerance requirements ensure adequate bearing capacity by directing the loads from the framing above the top plate directly into the studs below.
A Top Plate is the continuous timber beam on top of the walls that supports the roof structure by carrying the vertical forces from the rafters to the wall studs.
“A prudent person foresees danger and takes precautions. The simpleton goes blindly on and suffers the consequences.” –Ancient Proverb
We might do an entire series on these types of projects. Here is one such example:
We’ve seen some unique designs from architects who were either:
smoking crack cocaine, or were
fresh grads straight out of uni, or
who were many years experienced in the trade of being incompetent. Here is another night mare story which will either make you chuckle or shake your head and weep:
A Bridge That Cannot Be Fabricated: Avoid it!
A fabricator walks in wanting to fabricate a bridge. It’s a government project. So the tax payer is paying for all of this. The tax payer’s expert – who ever that may be – has no clue what they’re doing so they approve the designs and planning for a pedestrian bridge – which should be a really simple and straight forward project – to the total cost of $5 m to the tax payer. But of course, the architect and his bureaucrat don’t want to make a simple, ordinary bridge — oh no, that will not do. They want to make a name for themselves. So they design a bridge that simply cannot be fabricated. I wish I could show you the drawings, and explain in detail why it cannot work, but the bottom line is that, using the current technology we have, and that which is available in the best workshops in the land – I cannot see how this thing can be made. Maybe some day when we get some alien technology from Klingon, making this bridge will be a piece of cake. But till that time, mere human beings might struggle.
Think of taking a beam, twisting it at both ends (like you would do to a piece of string), and then trying to rotate it into the shape of a double helix. Do this for 6 beams and try and connect them together – like the spokes of a wheel being connected to a hub, some 10 m away. It’s not going to work! I call up my fabricator and tell him my concerns, warning him, in fact, of the dangers of this project, with a simple question: “How are you doing to fabricate this thing?”
His response: he insisted that it could be done. I insisted it could not – that he should try doing it before jumping into a dangerous and foolhardy project which he would be blamed for, and which he probably was not going to get paid for.
In any case it was clear to me that this was a building and construction project that was going to be very badly managed, and incur huge costs to the tax payer. The bridge that would be built, would be different to that which was originally designed. This means potentially huge rectification costs, from all parties concerned. You could easily treble the cost of the bridge, and double the deadline, and you still wouldn’t be half way there. In the end, the tax payer would be taken for a ride.
I said my piece, and in the end, I declined to be involved in the project.
Perhaps in time, maybe over the next 15 years, I can update you on the status of the project and the costs incurred to the tax payer.
Morale of the Story:
Listen to good advice, especially when it’s given for free.
Stay away from dangerous projects, and you won’t fall into a pit.
Don’t let a government bureaucrat anywhere near your projects – they’re always spending someone else’s money and not their own, so fundamentally: they don’t care.
Keep layout drawings simple
Embed layout drawing need to show only information required to set out the embeds. Unnecessary information clutters and causes only problems. Do not show weld details on embed layout drawings. For embeds going in the face of a wall need to add in nailer holes in the corners for attachment to the formwork. Same thing applies to Slab edges or any vertical embeds
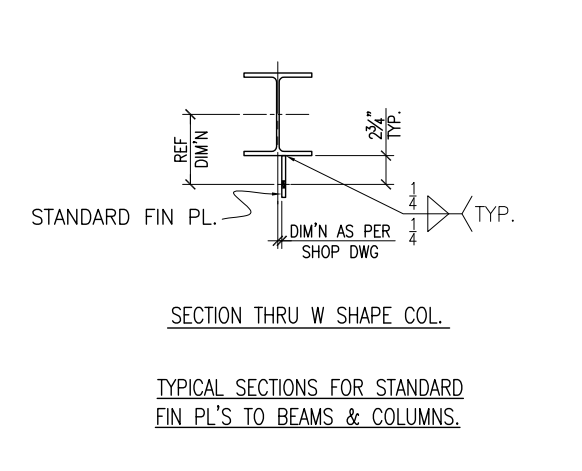
The main principle is the work points of the beam to the column must intersect. To achieve this the cleat should be offset to onside by half the Beam web thickness. This is usually done when you layout the main members. Make sure the layout is good
Here is a drawing to a shop detail which shows offsetting of the cleat to beam or column center line. Please note that the beam centerline and column center line should be matching. For US Fin plate the bolt distance is 2-3/4″ from the face of Beam/Column. For Australian situation, it will 55mm
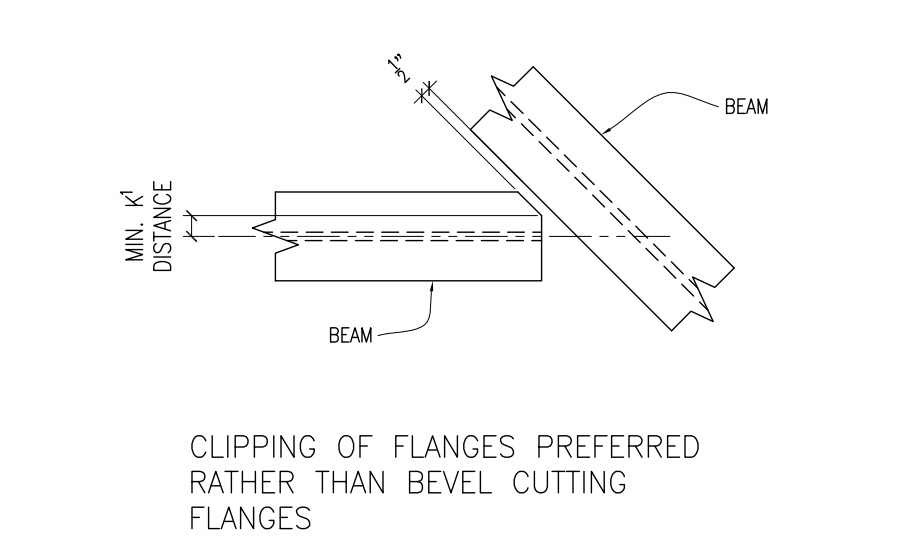
Given here is an image of how do the bevel cut in a beam to beam shear plate connection where the beam does not connect perpendicular. There is no benefit in creating full width bevel cut since it will only add material. All you have to do is remove the clashing bit