Month: September 2025

  • RFI to Reality: The Coordination Journey of Aspire Mickleham

    RFI to Reality: The Coordination Journey of Aspire Mickleham

    When people look at the Aspire Mickleham Childcare Centre today, they see a bold design and complex roof structure. But what they don’t see is the weeks of questions, clarifications, and coordination that turned a challenging concept into a buildable reality.

    As the detailer on this project, I had the privilege of leading that journey from RFI to reality.

    Asking the Right Questions

    Every RFI (Request for Information) was a chance to uncover something critical. Far from being “extra paperwork,” they became the backbone of accuracy.

    Some of the key clarifications included:

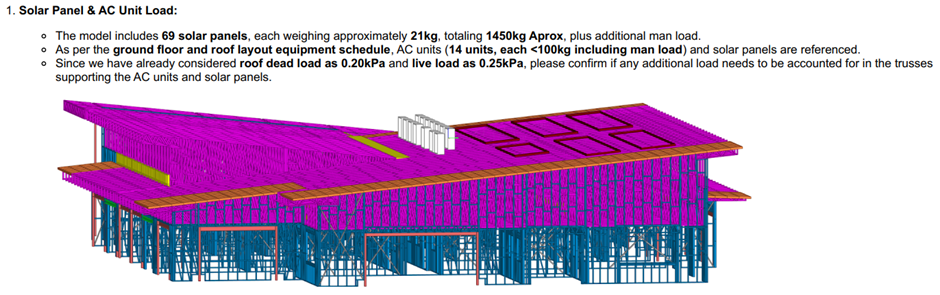
    • Solar Panel & AC Unit Load: Confirming the additional loads (approx. 1450kg from solar panels + AC units) and ensuring trusses were engineered accordingly.
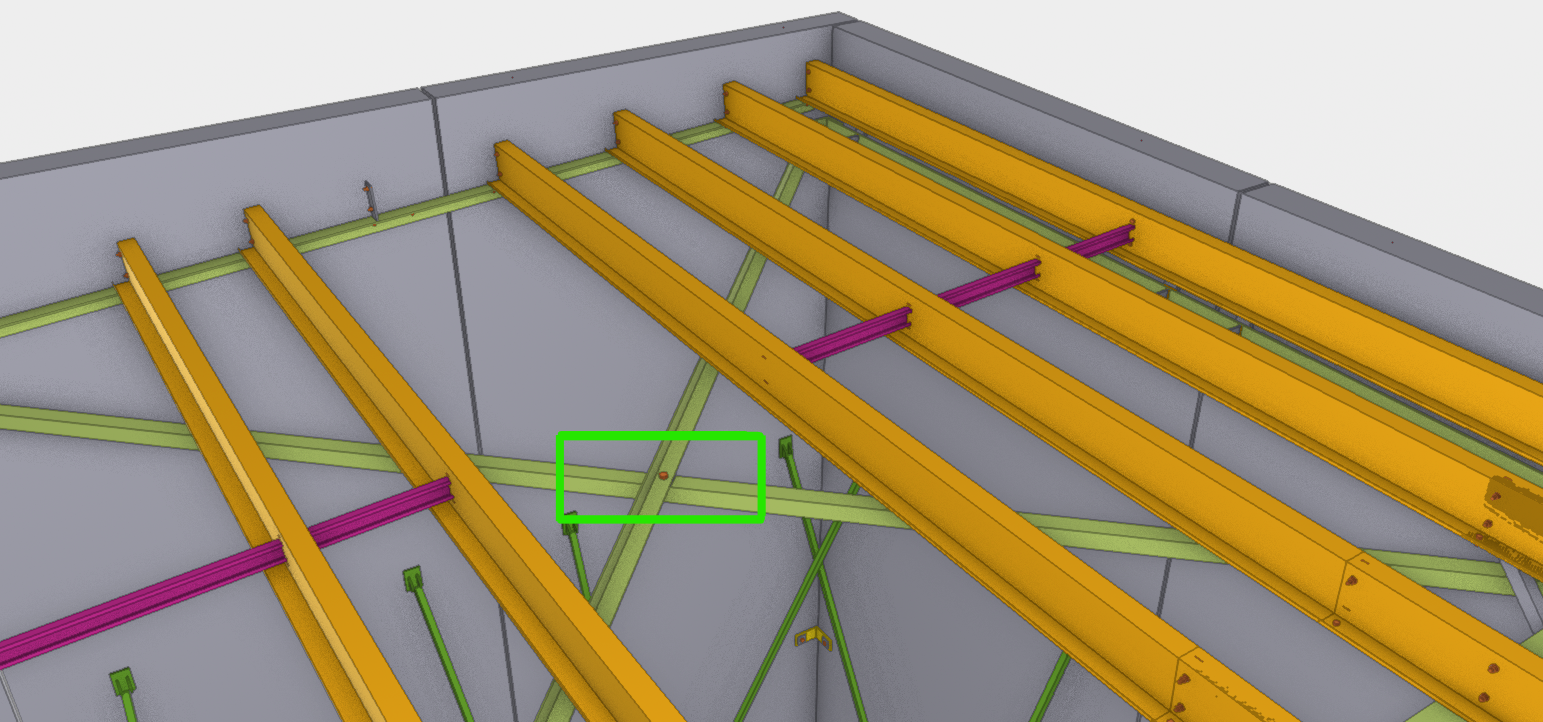
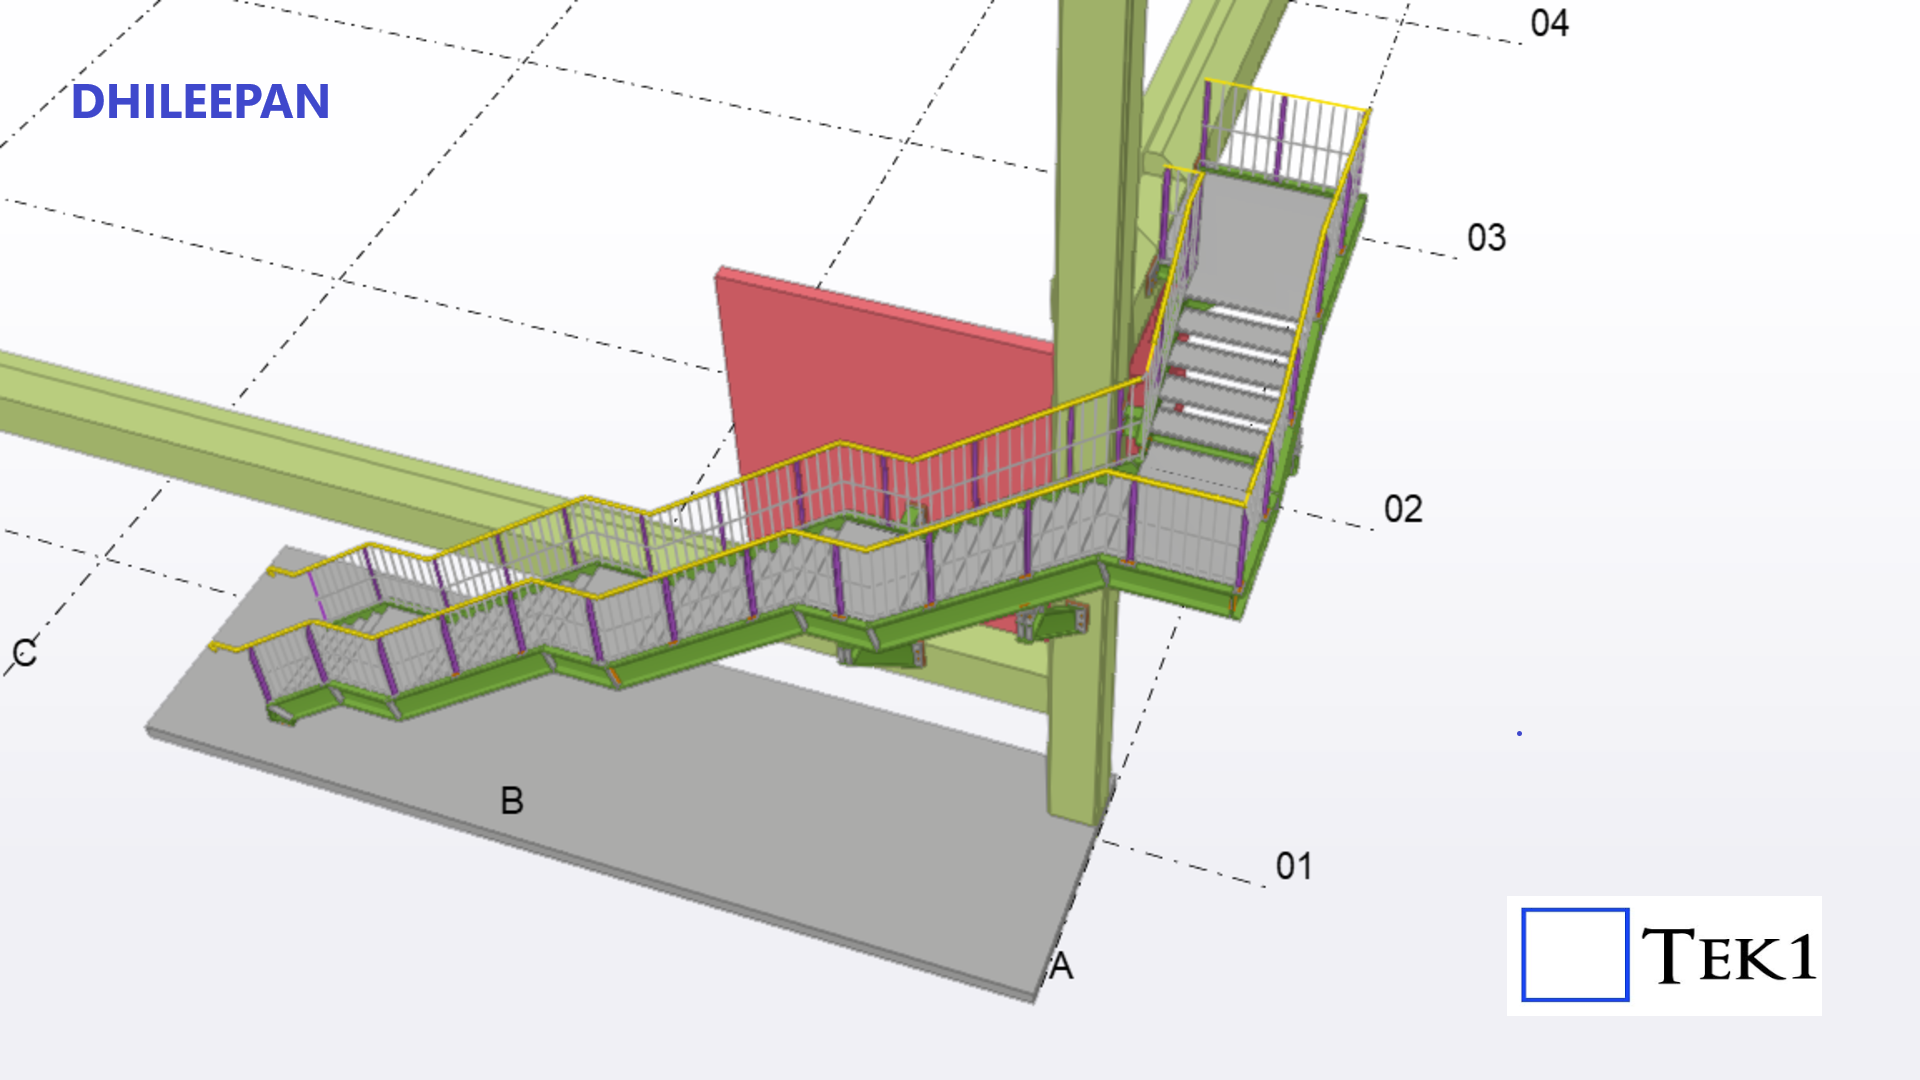
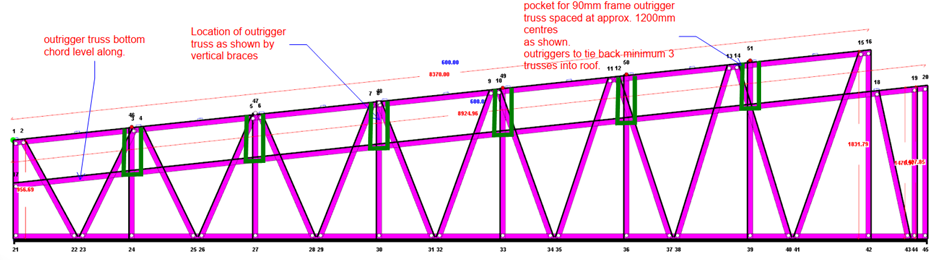
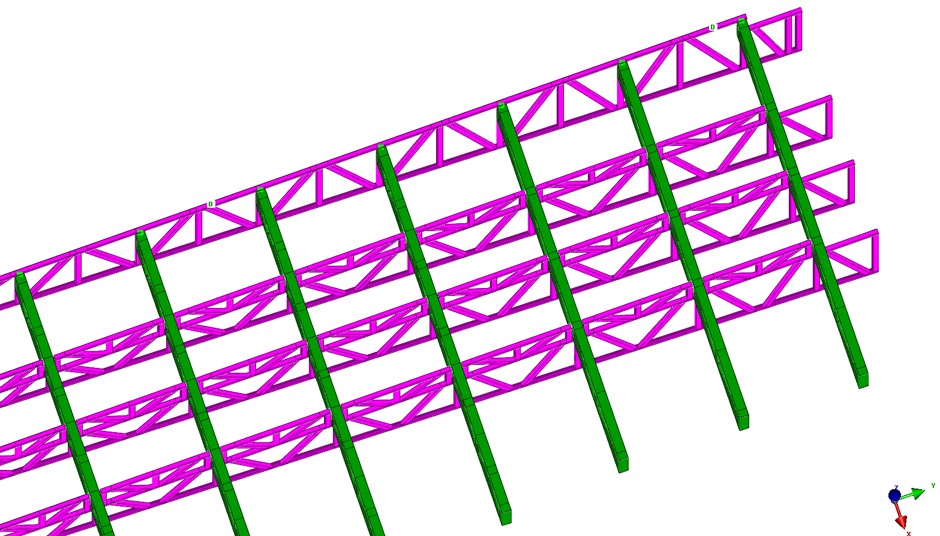
    • Cavity in Truss: Adjusting designs to receive and hold perpendicular trusses as per client sketches.
    • Opening Tolerance: Using a standard CAD template to confirm values and avoid site confusion.
    • Zero Wastage Detailing: Requesting RFIs for baseplate cut-outs and fixing strategies to avoid rework and material waste on site.
    • Plumbing pipe cutout in walls to avoid wastage

    Each question was about more than just an answer — it was about preventing future problems.


    From Model to Site – Zero Errors

    The best part of this journey came when the frames finally reached site:
    ✔️ No clashes.
    ✔️ No cutting or rework.
    ✔️ Every frame and truss installed as detailed.

    That’s when all the late-night checks and careful RFIs paid off.

    Lessons Learned

    For me, Aspire Mickleham reinforced one truth:
    👉 Great projects are always built twice — first in detailing, then on site.

    RFIs aren’t obstacles. They are opportunities to make a design smarter, safer, and truly buildable. Without them, risks multiply. With them, complexity becomes precision.

    Closing Thoughts

    This project wasn’t just about steel frames — it was proof that coordination can transform complexity into a zero-error success.


    Behind every great project is detailing that asks the right questions.
    If you’ve faced RFI challenges or detailing issues on site,
    I’d love to hear your story — and share how we solved ours at Aspire Mickleham.

    Priyan Gandhi
    Light Gauge Steel Detailer, TEK1 Pty Ltd.


  • How to Overcome Transportation Limits in Large Truss Projects

    How to Overcome Transportation Limits in Large Truss Projects

    In large-span steel projects, the challenge isn’t always about strength or design — it’s about logistics. Transport regulations often cap dimensions at 12m length x 2.6m width, meaning oversized trusses designed in software can’t physically reach site in one piece.

    At the Aspire Mickleham Childcare Centre project, I faced exactly this issue with trusses reaching 26.6m wide and 3.8m high. Without careful detailing, these trusses would have been impossible to transport.

    Turning Constraints into Smart Detailing

    We introduced splice points at logical structural positions, allowing the massive trusses to be split into transportable modules.

    Every splice was carefully designed so that the full structural load transferred seamlessly across the joints, ensuring strength was never compromised.

    By breaking trusses into modules, each unit fit within transport limits — making delivery simple and compliant.

    Detailed erection drawings guided the crane lifting and reassembly process, ensuring safe and efficient on-site construction.

    Client’s Initial Splice Proposal

    Initially i have got input like below for client’s end for splicing the length trusses

    Optimized Splicing for Seamless Load Transfer

    My Detailing Approach for Smart Splicing for Stronger Load Transfer

    Finalized Spliced Truss Frame Arrangement

    Smart Truss Frame Arrangement for Transport & Strength

    On-Site Erection — From Plan to Reality

    From Drawing Board to Construction Site

    The Outcome — Buildability First

    This approach not only solved the transport issue but also ensured:

    ✔ Zero on-site rework
    ✔ Safe and efficient installation
    ✔ Perfect alignment between design, fabrication, and assembly

    👉 Takeaway: Smart detailing bridges the gap between ambitious design and practical construction.

    I always ensure that every project is not just strong on paper but buildable in the real world.

    🚀 Every project has its own challenges — the key is finding practical detailing solutions that work on-site, not just on paper.

    I’d love to hear your thoughts or experiences with large-span trusses.
    📩 Connect with me, Priyan Gandhi | LGS Detailer, to discuss smarter detailing strategies.

  • Dont Lose time with missing dimensions

    Do you loose time with missing dimensions

    Have you ever used the wrong revision?

    Here is what is cooking at Tek1.

    If you would lik to to know more

    Here is a solution where you can scan the QR code and bring up the assembly model. know the revision number of the drawing which you should be using

    you may visite tek1.com.au for more information

  • Changing Vertical Leg Position for Easier Steel Erection

    Changing Vertical Leg Position for Easier Steel Erection

    The Issue

    • One common problem during steel erection is the incorrect orientation of bracing.
    • The correct orientation is bracing toes facing uphill.
    • When bracing is installed the wrong way, it must be taken down, rotated, and reinstalled—wasting time and increasing risk at height.

    Best Practice Solution

    1. Model braces with toes facing uphill
      • Provides a clear reference.
      • Reduces ambiguity for riggers.
    2. Review vertical leg positioning during detailing
      • Show correct orientation in shop drawings and models.
    3. Integrate checks into workflows
      • Add bracing orientation to erection checklists.

    Benefits

    • Efficiency: No wasted rework.
    • Safety: Fewer adjustments at height.
    • Consistency: Standardised practice across projects.

    Takeaway
    Standardizing bracing orientation and vertical leg position is a small design decision that prevents major site issues.

  • Spotting the Hidden Error in an “Approved” Stair Project

    Spotting the Hidden Error in an “Approved” Stair Project

    Recently, we received a stair project that had already been detailed by another party and even approved by the design consultants. For reasons unknown, the project eventually came to Tek1.

    The scope involved a large five-flight stair with a 90° turn. We were provided with the GA drawings and assemblies prepared by the previous detailer, stamped with approvals, and instructed to simply follow the approved drawings for any RFIs raised.

    At first glance, it would have been easy to assume everything was in order. But at Tek1, we believe that blindly following drawings — even “approved” ones — is risky. Every project deserves a careful check against standards.

    The Error That Changed Everything

    During our review, we noticed a critical issue: while all risers were at 190 mm, one riser was set at just 149 mm. This not only broke the uniformity but also violated the applicable stair standards.

    We immediately highlighted this to the client. What seemed like a “small” mismatch in a single tread had major implications. To correct it, the entire stair had to be revised:

    • Riser height was adjusted to 188 mm.
    • All mid-landing RLs shifted.
    • Stringer slopes changed.
    • Handrails and support frames were reworked.

    In short, one overlooked error had a ripple effect on the entire structure.

    Lessons Learned

    Projects that land with us after being dropped by other detailers often arrive with extreme urgency, as valuable time has already been lost. But no matter how hectic the schedule, Tek1 follows one principle: check the input drawings against standards before proceeding.

    This extra step not only avoids costly errors but also ensures safety and compliance — something no deadline should compromise.

  • Section Profiles for SS and Aluminium

    If you are detailing Aluminium or SS sections always confirm the section profiles.

    If you model without that confirmation, there is good chance that you will be spending additional hours and it will be wasted time for all

  • Memo 49: Context Switching – Projects Placed on Hold – Add an Invoice

    • You work on a project spending a lot of time on it e.g. three weeks on it. And then the client says: “actually, we want to place the project on hold”. That’s fine – but the question remains: as a detailer – what should you do?

    If a project gets placed on hold, you should immediately invoice a pro-rata amount for the work that is completed.

    • Let us consider a second scenaro: you work on a project for three weeks, and then you issue for IFA. And then the client puts the project “on hold”. 3-4 MONTHS later, the client returns you the approvals and wants you to immediately issue IFC. What do you do now?

    The costs of Picking up a project after forgetting it

    • Looking through our list, we have some 20-50+ projects that are “on hold”. Yet we are carrying the project for weeks (and sometimes months). In that time – we incur risks and expense: the project must be stored somewhere, and intimate knowledge required on the project must be stored / managed. You may forget this information when you return to the project, it is all a little “rusty” when you return, the chance of mistakes increases, sometimes, important staff may leave the firm, taking with them context specific to a particular project. All of this will affect your ability to deliver quickly, effectively, and without mistakes.

    The Costs of Context Switching

    If a client demands that a project be completed NOW, then you have to stop what you are currently doing, figure out the entire context of a project (that was placed on hold many months ago), and then you have to restart and complete it, now.

    That is not easy.

    You Must Charge

    You have to charge for that. Feel free to charge 5-6 hours for this.

    There is a cost and risk associated with delays. It does not come for free.