Author: Niranjana Murugan

  • HAVE YOU TRIED IN AUTOCADD#3: QUICK SELECT (QSELECT)

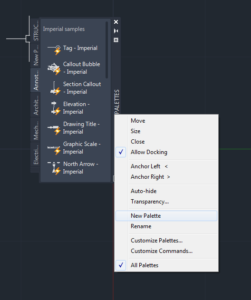
    Shortcut command: QSELECT (right click on the work area to get this command)

    When you need to select a specific element in an AutoCADD project, like for example some construction lines, you could select them either one by one or by using select similar when you need to select some specific items for which you know the properties we can use the quick select tool. This is very similar to the selection filter in Tekla Structures and in Revit.

    Using Quick Select or QSELECT, you could select the line of specific length or a specific colour. You could also use the tool to select elements specifically needed to work on in any area.


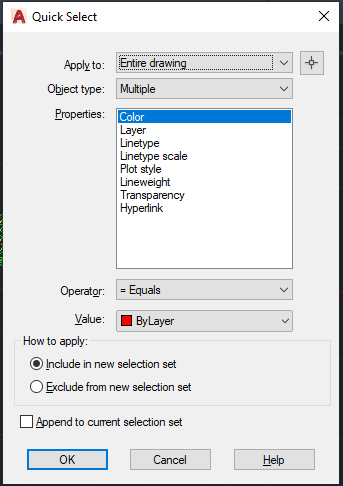
    Here is the list of options:

    1. Apply to: This restricts your selection to the required area or to the entire model as required.
    2. Object type: Select the object which needed. For example, if we need to select all the lines which has length less than 1m then you need to set the object type option as line.
    3. Properties: in this category we can specify the property of the object we need to select. In case of above example it would be the length.
    4. Operator: it is the usual comparison operators. for this case we could give lesser than.
    5. Value: According to the property we select we need to specify the value. in the above case we could specify 1000mm.
    6. How to apply: This is part is more interesting and very useful as well. If we use the radio button “Include in new selection set” the elements which passes the condition would be selected, if we use “Exclude from the new selection set” the case will be vice versa. ie. all the elements which does not satisfy the condition will be selected.

    Please find a short video on demo of the content below.

  • HAVE YOU TRIED IN AUTO CAD #2: CREATING CUSTOMIZED NEW RIBBON

    We do use a set of commands frequently, in those case we used to switch between using mouse and keyboard. if we try to click on the icons on the default ribbon we need to search them every time.

    Auto cad has provided with an awesome facility that we could customize a ribbon in our work space, while customizing a ribbon we could just select the tools which we need and we could have a personal ribbon.

    Procedure:

    1. we could use the CUI command to enter into the “Customized user interface” dialog box.
    2. In customize tab, we need to create a ribbon. So, select the + symbol near the ribbon. Here we have two options tabs and panels.
      Tabs: it is the header of the ribbon and they can have number of panels into them.
      Panel: They were the header of a group which has number of tools.
    3. We first need to create a panel by just right clicking the name panels then new panels and name your custom panel.
    4. In the list of commands list which is available below select the command and drag and drop it into the panel rows.
    5. We could create Tabs by right click and name it.
    6. Once we have created all the panels we need to drag and drop them into the tab we have created.
    7. We could assign this ribbon to work space to have our own customized sets of tools in a single ribbon.
    8. we could use the combinations of existing tabs in our ribbon as well.

    We could also customize our work space.

  • Data Enriched COBie

    Data Enriched COBie

    COBie: Construction Operation Building Information Exchange

    COBie is a standard for the exchange of Building Information during the life of a building project. Information containing specific project details helpful for understanding, operating and maintaining a facility properly. One of the items is the inventory of spaces and their functional requirements.

    To facilitate requirements the designer must provide a spatial layout for building, facility, floor & room number which forms the basis of assigning equipment and products to specific space. Strictly, there is no information on interior components such as furniture nor on structural members.

    In order to obtain information at right time throughout the life cycle of a facility in BUILDING DELIVERY PROCESS, a mechanism is needed. Such a mechanism should filter out unnecessary information, reorganise for owner’s convenience.

    Spreadsheets can be a good tool to manage information in small amounts and simple relationships. The COBie project bridges the gap in interpretation by identifying the similarities in the process that contractors, operators, maintainers & asset managers use to accomplish daily activities.

    What COBie does: As an information exchange standard, it has capabilities of everything from planning, vdesign, construction, commissioning all the way to operations, maintenance & management of spaces. It simply changes the required deliverable from paper documents to electronic formats, facilitating building information interchange.

    “If you use COBie in a way which violates the COBie specification you are no longer meeting it’s requirement. You are doing something else that is not COBie”  Bill East, Inventor of COBie

    Here is the data flow in COBie:

    Compiled and edited by Shantha Priya S.

  • DYNAMO: THE GAME CHANGER

    Automation is the process of making a task automatic, an essential requirement for all business processes to achieve accuracy in repetitive tasks, where humans or manual tasks are prone to error. One of the most powerful automation package of recent times in the construction industry is the Autodesk’s Dynamo. It is an open-source visual programming tool which works with Revit and other Autodesk products but could also be integrated with non-Autodesk programs using Standalone releases like Dynamo Studio, Dynamo Sandbox, and Project refinery.

    Unlike other Application Programming Interfaces which are used by well-grounded programmers, people with minimal coding knowledge can create custom scripts using the Dynamo to access the Revit interface. It runs on the background of Design script and Python. With Dynamo, the opportunities are endless and many time consuming tasks in various disciplines such as design, detailing, modeling, analysis, documentation can be automated.

    We use Dynamo to find potential solutions to problems we face day-to-day. One such problem was the unavailability of 3D grids in Revit. Moreover even when exporting a Revit model to CAD .dwg format, the grids failed to show up but they are available with Ifc exports. We developed a simple script to solve this issue using Dynamo.

    The workflow between Revit and Dynamo is shown here.

    The above snip shows the sequence of nodes in the dynamo workspace which were used to create Grids in 3D view.

    We found it quite interesting when we started digging to explore the capabilities of Dynamo to help us with our jobs. Learn more about Dynamo: https://dynamobim.org/

    If you have any questions or opinions about this post please do comment below.

    Written by Madhumitha Balaji

  • HAVE YOU TRIED IN AUTO CAD #1: CUSTOM TOOL PALETTES

    Many of the time we use same commands and a set of procedure to work in drafting which consumes time we get used to it over time. For example: to insert a section tag we always need to use insert command and find the block and specify the scale and insert it eventually we need to consider scale of the view port which we are going to present the drawing.

    Instead of doing the same insertion every time we could customize a tool palette so that we could have a tools we use frequently.

    For example we need to label the members with its name in the layer “TAG” and color “GREEN”. We need not edit the property of the text every time. We can create a source file and save it on a common location (so that all the Auto CAD users can use the same file) and have the text in that file. And we could create a custom tab in the tool palette where we could just drag and drop and use it in all other files we work on. It will carry the general properties such as layer, color, line type and line type scale etc.. we could use the same for blocks, dimensions and all geometries as well.

    Notes:

    1. To view tool palette we could use command “TP”
    2. Create a source file in some network drive location with all the blocks so that it is easy for other users to fetch them.
    3. To create a new tool palette right click on the header then customize tool palette.
    4. In the customize window right click on the palettes list and create a new palette. We could do the same by just clicking on new palette option when we right click.
    5. Then we could just drag and drop the entries like blocks into the palette and now we are done with the loading part. We could use the same in any other drawings. It makes the work so easy and also helps by saving a lot of time.