Tag: revit

  • Revit Project Data and Parameters Populate in Title sheet


    Input Data

    • Project Details – Does the Revit file allow us to create Project Details. How and where is the data available to read?

    For Project information the details will be added and done in the Manage tab as shown below

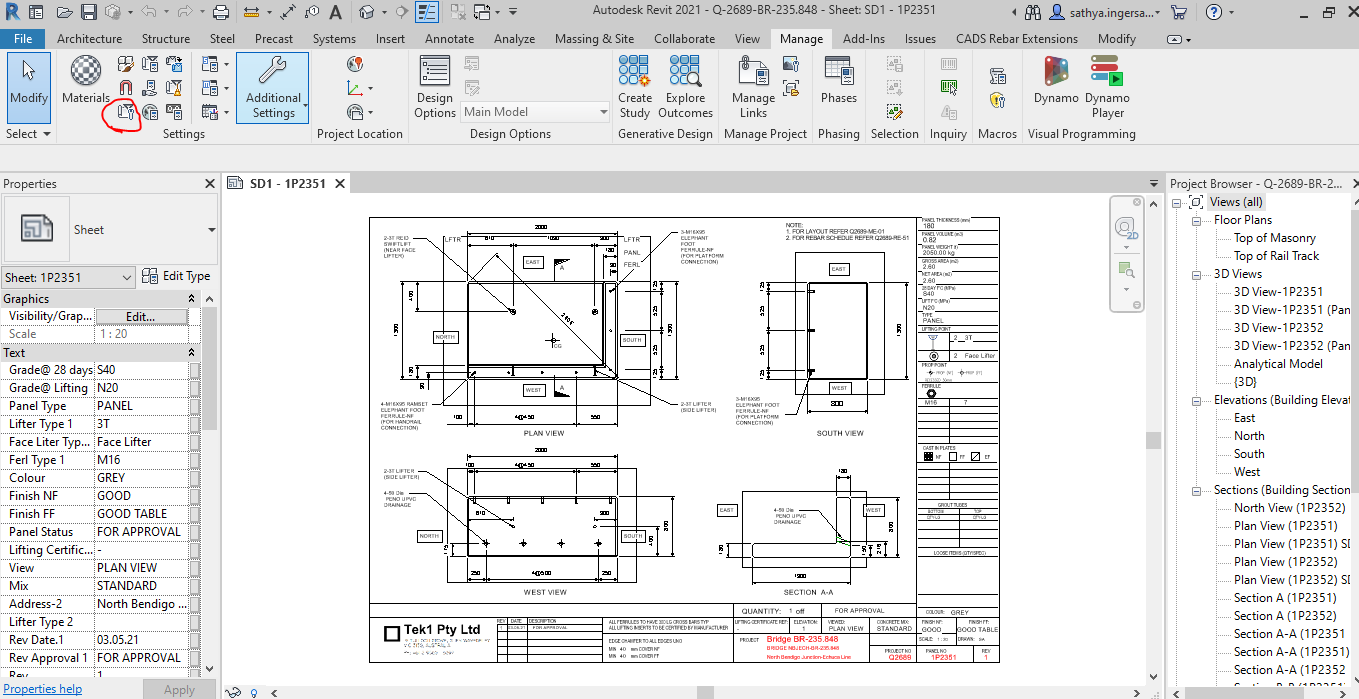
    Step 1: Clicking to manage tab and click on the red clouded region as Project Information


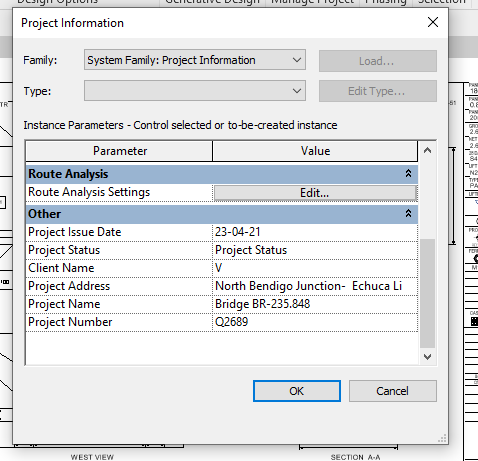
    Step 2: Entering the Data about the Project as Shown above


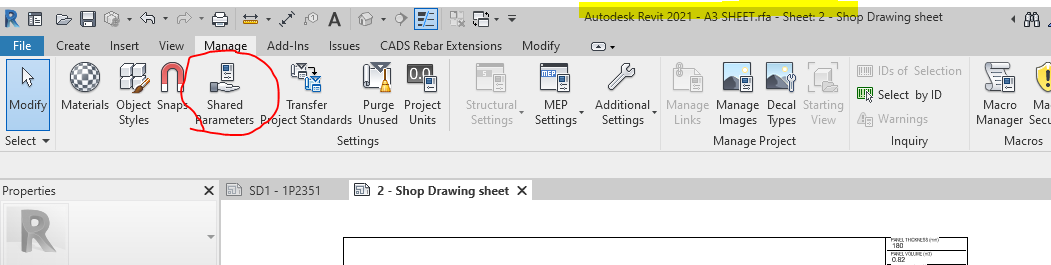
    Step 3: Open the sheet family and click on the Shared Parameter Option in the Manage tab


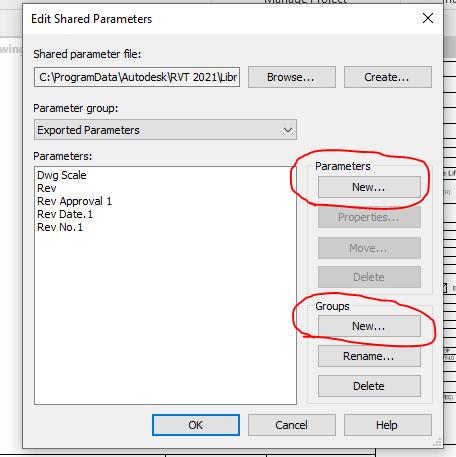
    Step 4: Create the new parameter if needed and Create new group where the parameters are to be called for.


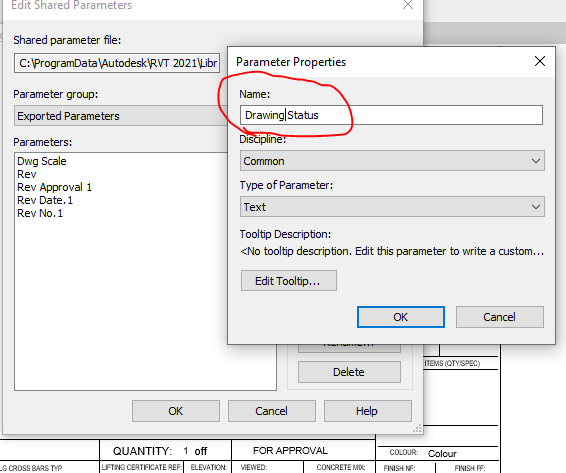
    Step 5: Add the new parameter in the Paremter property. Once parameter done it can’t be edited and it has to be removed and create a new one .


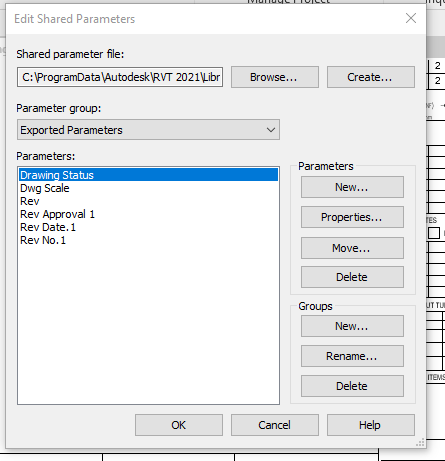
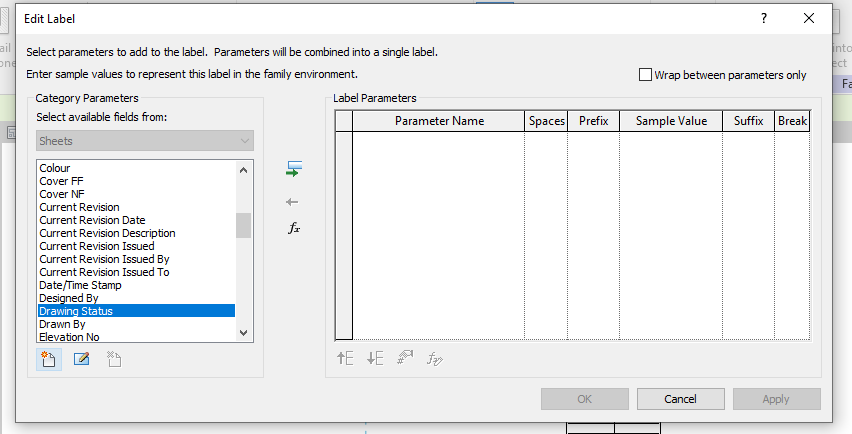
    Step 6: Now the “Drawing Status” Parameter are now called under the Parameter group exported parameter.


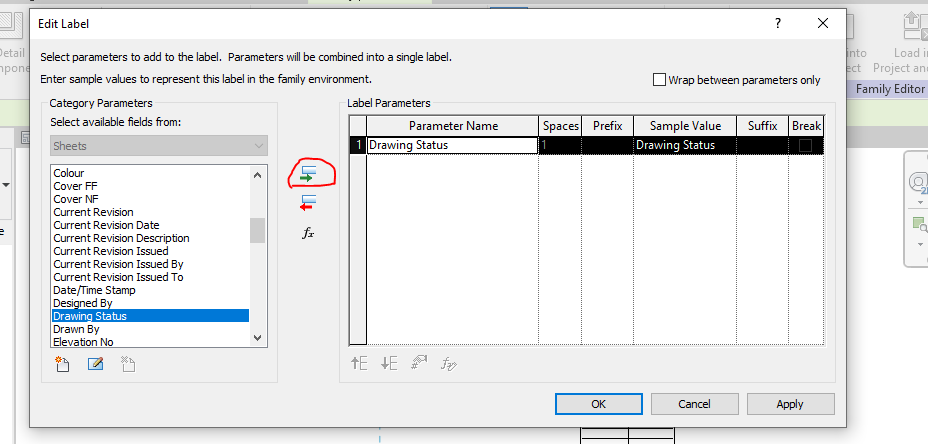
    Step 7: Click the Label Parameter to call the label that are already created in parameter


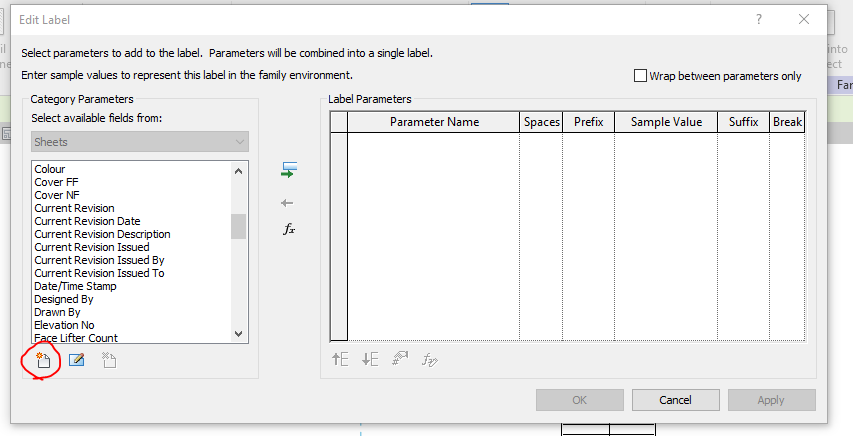
    Step 8: The parameter which was created in shared was not displayed so click on the add parameter to call from the group.


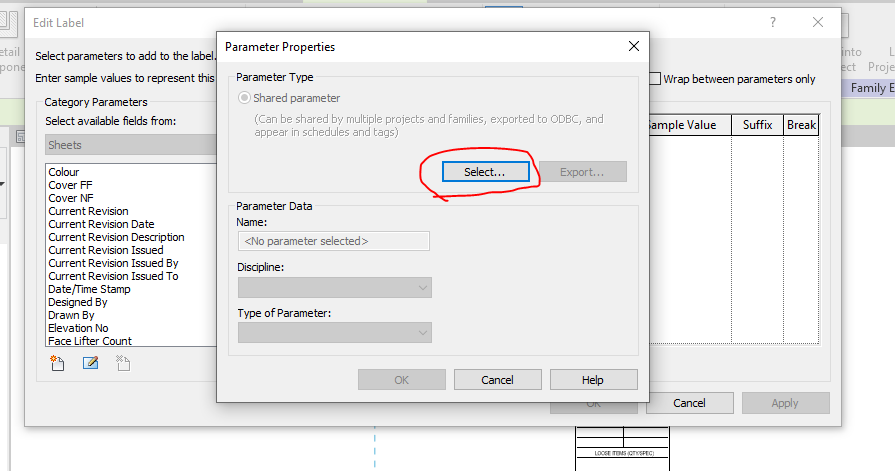
    Step 9: Click on the select button to call the shared parameter group defined.


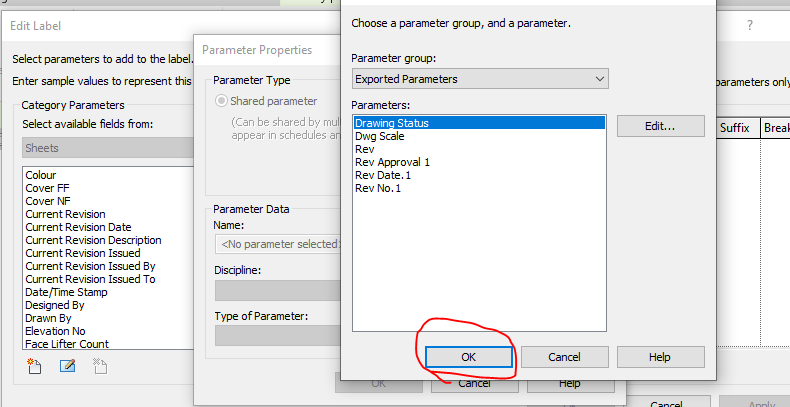
    Step 10: Click on the required parameter to call and click on ok


    Step 11: The parameter which was not available in the list are now generated and called


    Step 12: The parameter which was not available in the list are now generated and called to edit parameter list


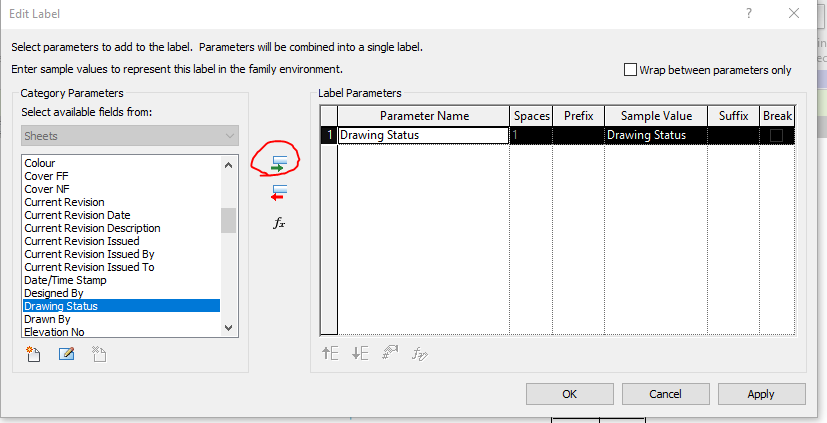
    Step 13: Then click the add parameter lab clouded in red and the following parameter will be added in the label and then click ok.


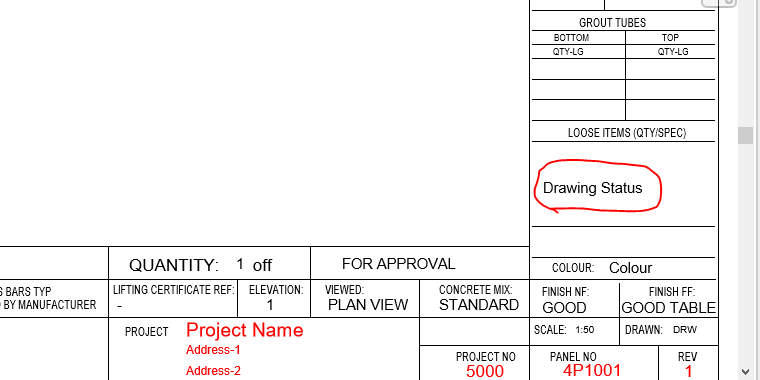
    Step 14: The Label “Drawing Status” was now added in the Sheet Family


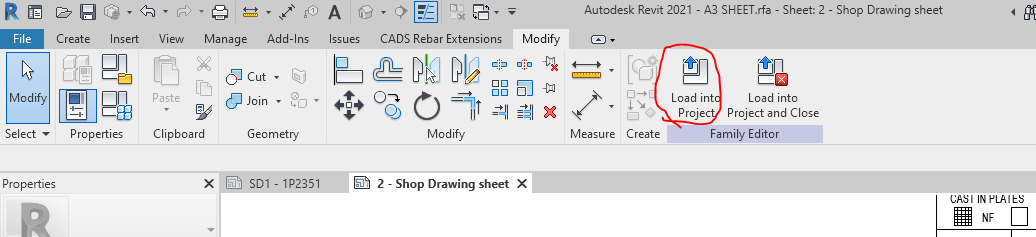
    Step 15: Then click on the “Load into Project“ button to load the Shop Drawing Sheet in the Project.


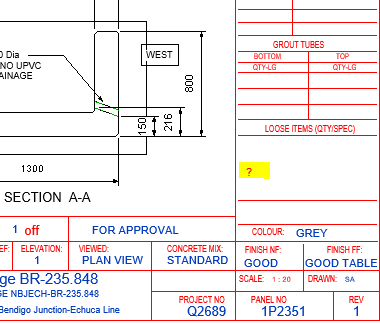
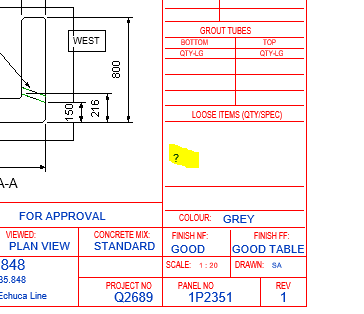
    Step 16: The question mark we highlighted are the Parameter “Drawing Status” and it’s not editable at this stage because this shared parameter was not called in the Project Parameter. To sort this please follow the below steps.


    Step 17: Click on the project parameter to call the shared parameter we defined in Sheet family


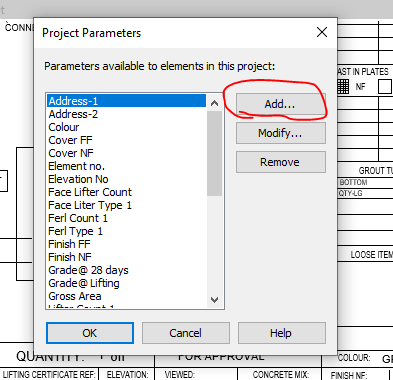
    Step 18: Click on to add button


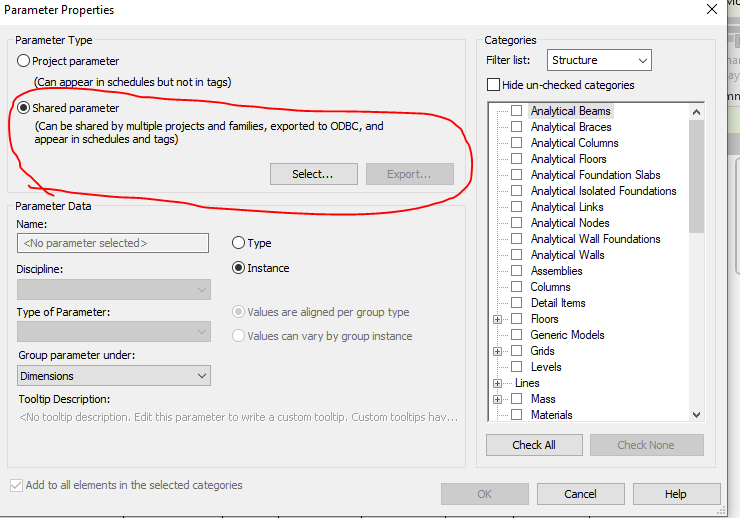
    Step 19: Click on to the shared Parameter and then click select button


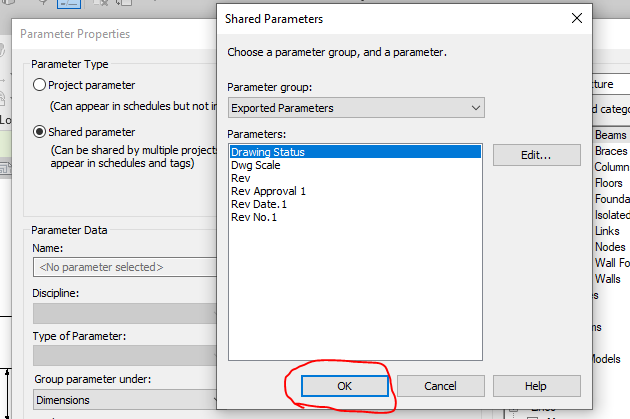
    Step 20: Click on the Parameter you defined previously and need to be editable and click ok.


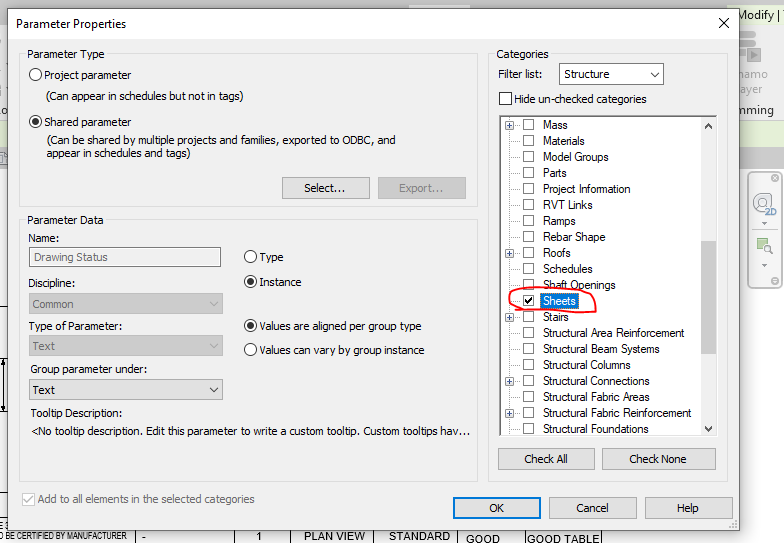
    Step 21: Once the shared parameter are defined on Project Parameter then click the Check box on the right end shown where the parameter to be display in your revit file and then click ok.


    Step 22: Now you can see the question mark colour changes from red to blue which is editable one.


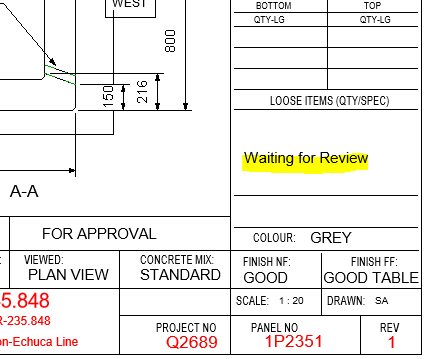
    Step 23: The Parameters are added and edited in the Shop Drawing Title Sheet.


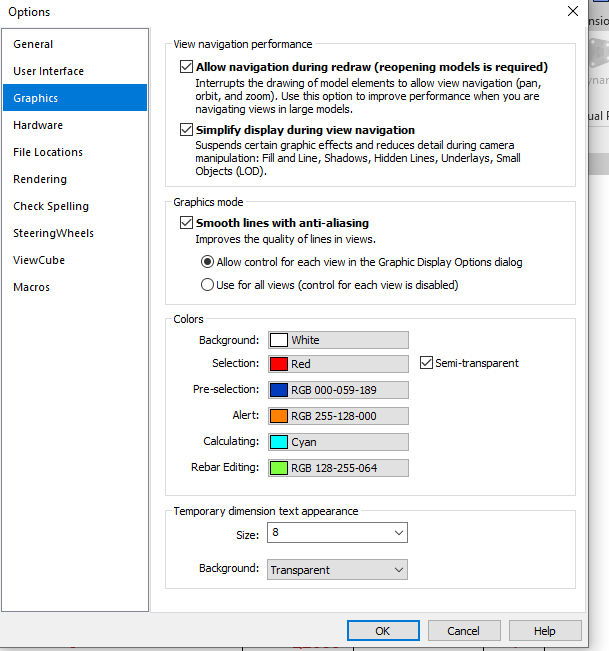
    Idea: If you like to make your visuals to find the parameter is in editable or not editable please do the following thing below

    Go to file tab and click on the option button below and set the graphics by changing the colours as shown below instead of same colour

    Thanks to Koshy, Ben ,Venkat and Parthee for Supporting and guidance .

  • DYNAMO: THE GAME CHANGER

    Automation is the process of making a task automatic, an essential requirement for all business processes to achieve accuracy in repetitive tasks, where humans or manual tasks are prone to error. One of the most powerful automation package of recent times in the construction industry is the Autodesk’s Dynamo. It is an open-source visual programming tool which works with Revit and other Autodesk products but could also be integrated with non-Autodesk programs using Standalone releases like Dynamo Studio, Dynamo Sandbox, and Project refinery.

    Unlike other Application Programming Interfaces which are used by well-grounded programmers, people with minimal coding knowledge can create custom scripts using the Dynamo to access the Revit interface. It runs on the background of Design script and Python. With Dynamo, the opportunities are endless and many time consuming tasks in various disciplines such as design, detailing, modeling, analysis, documentation can be automated.

    We use Dynamo to find potential solutions to problems we face day-to-day. One such problem was the unavailability of 3D grids in Revit. Moreover even when exporting a Revit model to CAD .dwg format, the grids failed to show up but they are available with Ifc exports. We developed a simple script to solve this issue using Dynamo.

    The workflow between Revit and Dynamo is shown here.

    The above snip shows the sequence of nodes in the dynamo workspace which were used to create Grids in 3D view.

    We found it quite interesting when we started digging to explore the capabilities of Dynamo to help us with our jobs. Learn more about Dynamo: https://dynamobim.org/

    If you have any questions or opinions about this post please do comment below.

    Written by Madhumitha Balaji

  • Demo – Create Revit Panels Directly From AutoCAD Panels (Precast)

    Demonstrates the ability to transform 2D AutoCAD files into a native Revit format.

    This is a demo of my latest plug-in which demonstrates a proof of concept – i.e. a MVP (Minimum Viable Product). The programming was a little trickier than normal – because we are not using the .NET API, but the COM Interop API and the Revit API – something which I have not really explored prior to this post.

    What does it do?

    If you have drawn some panels in AutoCAD, this plugin allows you to quickly and accurately convert those panels into Native Revit walls. You can then give Architects and builders those Revit files –  otherwise it will be very difficult for them to work with AutoCAD files.

    This gives you a competitive advantage over your competition, because you can quickly and easily do it – and it makes the job of architects and builders easier – especially given the rapid push everyone’s making into BIM technologies.

    Enough talk. Here is the demo. Enjoy:

    Create Panel Walls in Revit Directly From AutoCAD – Demo from Tek1 on Vimeo.

    (I’ve made the command so that it works even when you have AutoCAD open. This allows detailers to quickly switch to Revit and AutoCAD and to delete and restart if need be. Also requiring that AutoCAD be open ensure that detailers know exactly what file they are working with and what files they are converting. It eliminates a whole lot of errors.)