Month: October 2017

  • What is concrete cover? Why is it important? (Precast)

    What is concrete cover?

    Cover refers to the distance between the outside of a concrete structure and the reinforcement. Perhaps see  this from the diagram below:


    General overview
    This is a general overview. Now let us zoom in and see more detail.


    Concrete Cover Detail
    The distance between the concrete and the reinforcement bars is called “cover”. This distance has to be a minimum distance – as specified by the structural engineer.

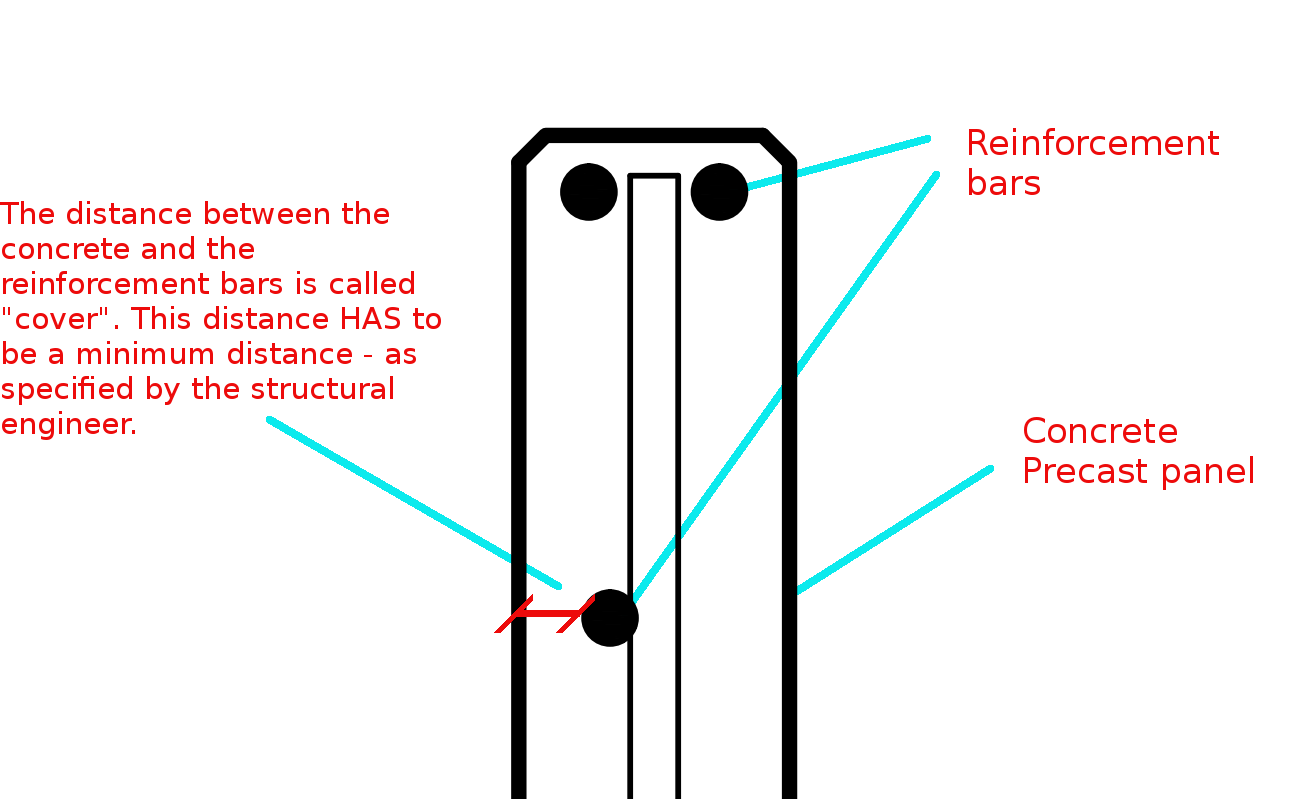
    You need to  have a minimum cover:

    There needs to be a minimal distance between the reinforcement bar and the outside of the panel.

    Why do you need this?

    Reduces Corrosion
    • Having a decent amount of cover reduces the rate of the corrosion of those reinforcement bars. If you have only 5 mm of cover – if the bar is literally just below the surface of the concrete, then that reinforcement is going to corrode away very quickly – especially if you are close to the sea. This means that the concrete will lose its strength very quickly, and a catastrophic failure might be on the cards. That’s why it is very important that the concrete does indeed have some minimal cover.
    To Improve the Structural Integrity of the Concrete:         
    • If you have the reinforcement bar too close to the concrete, then the structural integrity of the structure will be somewhat compromised.
    Fire Protection:            
    • If at all there is a fire, you don’t want the reinforcement bars igniting. If it does then the fire is sure to blaze out of control. That’s another reason why it’s very important that the bars some minimal distance away from the surface of the concrete. That will better enable the structure to remain in tact if at all there is a fire.

    A Response to a Reader’s Question:

    A diagram attached with a question from a reader.
    A diagram attached with a question from a reader.

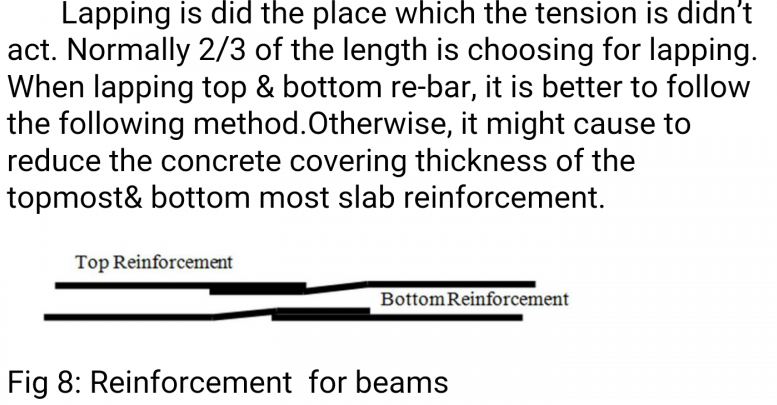
    “(Q1) It appears that one of the lapped bar is bent while the other isn’t. Or is it just a drawing convention problem?”

    (Q2) I don’t get why the lapped bars have to be positioned differently when placed on the top vs at the bottom in order to ensure that the concrete thickness will not reduce, as stated in the figure. My thought is that both positioning ways occupy the same volume.

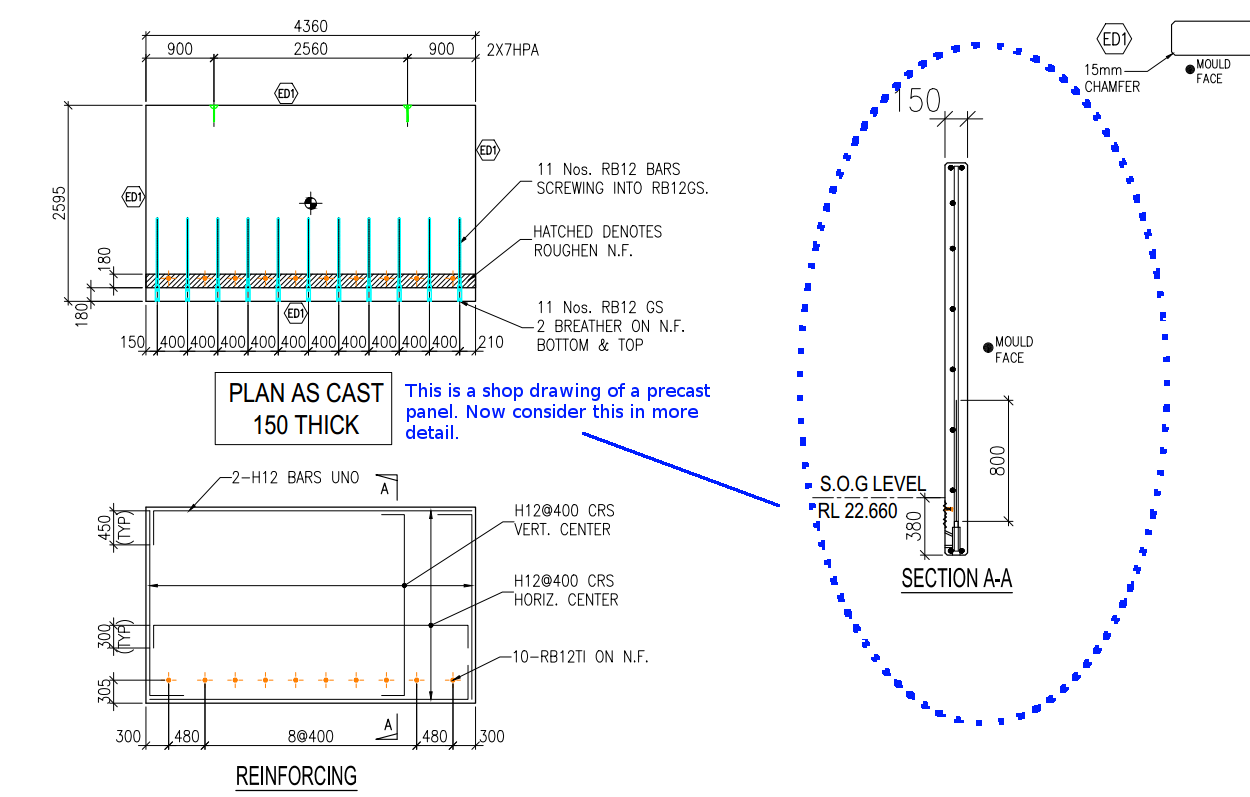
    The answer to this question is best understood by studying the below diagrams:

    Minimum Concrete Cover
    Caption: The engineer has specified that the minimum cover required for this concrete panel is 40mm. If we put the reinforcement bars one on top of the other, then the cover will be reduced (sometimes dramatically) – and this is not good! Minimum cover needs to be maintained. That’s why the bars should be position appropriately to ensure that minimum cover is guaranteed, or you could also purchase reinforcement that is bent a little bit.
    Cover with Bent Reo
    Caption: This reinforcement configuration – with the reo slightly bent, ensures that the minimum cover (in this case 40mm) is maintained – as specified by the engineer.

    The Answers to the Questions

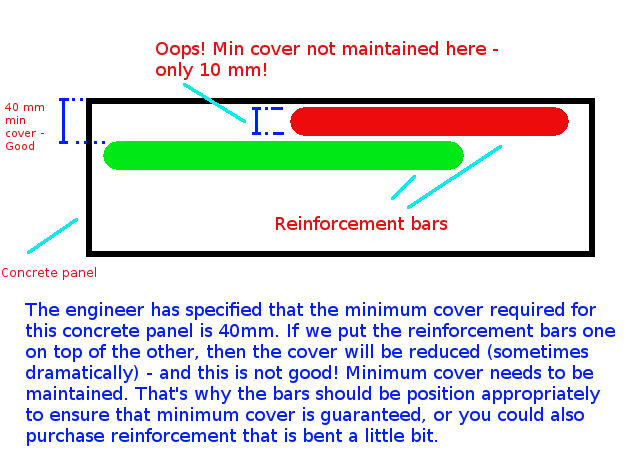
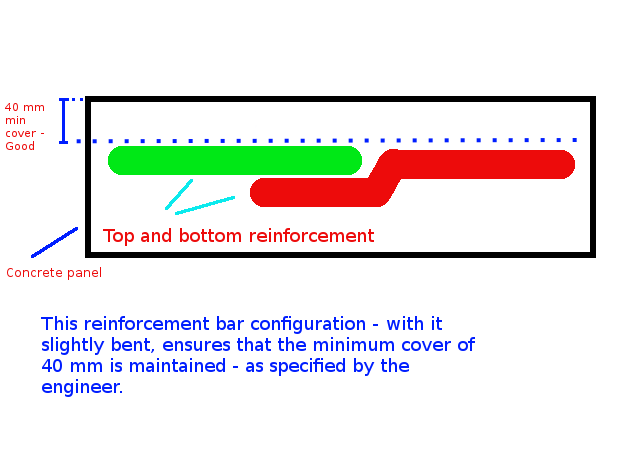
    (A1) When I draw reinforcement, I do not add a lot of the essential details which are assumed to be standard workshop practice. We are required to maintain a minimum cover. The diagram you have posted above is an example of what actually occurs in practice (but is almost never drawn that way). The reason it is bent is to ensure that the minimum cover requirements are not compromised.

    (A2) That is absolutely correct – the panel’s thickness will not be reduced, but the thickness of the cover will change, depending on how one places the “reo” (reinforcement) rods.


  • Where did the AutoCAD File Dialog User Interface Go – How to Return it back to normal after using AcCoreConsole? (AutoCAD)

    What Happened? No Dialog Box UI in AutoCAD?

    Revert AutoCAD FileDia
    If you’ve run AcCoreConsole and can’t bring back the normal user interface, just remember this trick.

    So I’ve just managed to run AcCoreConsole – some script. And it’s changed some settings. And now when I open regular AutoCAD, when I type in netload – it seems that I’ve lost the ability to open/select things using the user interface. Now I have to manually type out long file names into the command line which is the height of tedium.

    Why did it happen?

    It happened because we were not meticulous in the running of our AcCoreConsole scripts. We should be sure to ensure that we save settings properly so that when users use the regular AutoCAD program, they don’t have to reconfigure the entire environment away from what works well for AcCoreConsole, back to what they are normally used to.

    How to fix the problem immediately

    You can file the problem by typing in:

    That should change those settings back to normal.

    How to avoid the problem in your script file

    Don’t forget to return it to the original settings: anything beginning in a semi-colon is a comment and will not be executed.

    You can see a gif of it in action above.

  • How to load lisp files in AcCoreConsole (AutoCAD .net)

    A commenter had some trouble loading the files. So perhaps the AcCoreConsole is confusing people.  So here is a post which will hopefully clarify how to do it.

    It’s quite simple:

    1. Have the LISP file ready.
    2. Load the lisp file
    3. Call the command.

    It works exactly the same as in AutoCAD – the UI version. But remember you cannot call any commands which make use of Windows forms or WPF. It is strictly command line only. So things like APPLOAD are not going to be very effective in the AcCoreConsole.

    1. Have the Lisp File Ready

    Here is an example that you can download.

    The same is pasted below if you feel uncomfortable in downloading it:

    ;; Comments can go after the semi colon

    (princ “\nPRINC TO COMMANDLINE BY LOADING/EVALUATE THE *.LSP FILE!”)

    (princ “\nNow we define a lisp-defined AutoCAD-Command called ‘HELLOWORLD’”)

    (princ “\nAutocad-command HELLOWORLD is defined NOW”)

    (princ “\n HelloWorld loaded, start HELLOWORLD with command: HELLOWORLD or with (c:HELLOWORLD)”)

    (princ)


    (defun c:HELLOWORLD nil

    (princ)

    (princ “\n Hello World!”)

    (princ)

    )

    I modified it from a file kindly posted by someone in the AutoCad forum. Remember to save it with a .lsp extension!

    2. Then Load the Lisp File

    Type in the following in AcCoreConsole:

    (load “C:\\Users\\Koshy\\Downloads\\DownloadedCode\\HelloWorld.lsp”)

    Of course – you will substitute the path to the file as it appears in your computer.


    3. Then Call the function:


    In AcCoreConsole type in:

    (c:HELLOWORLD)

    or alternatively:

    HELLOWORLD

    The Result


    Lisp Function output
    Shows the output of a lisp command executed in AcCoreConsole.
  • How to Get Parallel Grid Line Points (Tekla Open API)

    All Gridlines Dimensioned
    When marked to all grid lines, this makes it easy for the folks on the floor to mark out. Don’t make it hard for them!


    What is the task at hand?

    So I get some phone calls the other day – people complaining. They want changes. Yet again! Why  can’t these people make up their minds! That means I have to get off Facebook, go back to my code – which I hopefully haven’t forgotten, and I have to try and  make their changes fit in, with the least amount of trouble.

    What did they want this time?

    They wanted to dimension bolts not just to one grid line, but to every single one. Ok that’s fine. How am I going to select all parallel gridlines, given an input of just one gridline?

    1. First I need the input Gridline. This is given. We have the input gridline because we’ve asked the user to select a relevant gridline.
    2. We need to get the actual grid, using that grid line.
    3. We need to get all pertinent gridlines using the grid – we want to get only the gridlines that are parallel with our originally selected gridline.
    4. Using those filtered gridline points, we need to extract out a pertinent reference point and add that to the set of points used to create the dimensions.

    1. The Input Gridline

    • This has been obtained by selection.

    2. Getting the Actual Grid


    3. Getting Pertinent Gridlines


    Now we extract the relevant points given the above information.

    This is the final result:

    4. Create the dimensions

    We’ve got the bolt dimension (previous post). We have some grid line dimensions (see above code). Add the above points to the bolt positions and then create those dimensions as outlined in the previous post. Voila! We are finished! Now back to WoW!

  • Returning Inside Using Statements (AutoCAD .net API)

    WPF Databinding operations in the AutoCAD .NET API
    A demonstration of using a WPF User control to display information pertaining to missing and/or extra items within a panel, using the ComparePanels Command.


    While writing the above AutoCAD plug-in, I faced a small conundrum in the below code:

    • The question for you is: will the transaction be disposed of, and committed given I have returned the bool before it reaches the end of the using statement?

    Will it be disposed?

    The short answer is yes. The transaction object implements IDisposable. So, finally you can trust that the transaction will be disposed, and that any objects that it opens will also be similarly disposed.

    Will the transaction be committed?

    I had a peak into the Dispose methods using Reflector. I didn’t see any automatic committing of any transactions – so I am venturing to say that no, the transaction will not be committed. In other words, we’ll have to restructure the above code to ensure that the transaction is committed before we issue the returning statement. Perhaps the AutoDesk team should abort a transaction if it is not committed before a transaction is disposed?

    Summary

    So the lesson is: (i) always be sure your transaction is being committed, and (ii) a using statement obviates the need to ensure that your transaction is actually being disposed of.