Month: March 2020

  • How does Tek1 do Bubble Deck? Our Shop Drawing Processes

    Sample Drawings

    The best way is via demonstration. Please see some of the video demos we have put together. It is not by accident that our drawings come to you quickly. There are 10 distinct stages. We will upload the rest of the stages as we get and when we get an opportunity.

    The full list is here:

    Many commands do not have any video documentation attached. Some of the ones we have are documented below:

    We have updated our Insert Panel Lifters command:

    Dimension Tooling

    1 – Layout Commands

    enter help info here

    2 – Shop Drawing preparation

    3 – Bill of Materials

    4 – Dimension Panels

    enter help info here

    Insert Blocks

    enter help info here.

    Utilities

  • CHECK TRANSPORTATION FEASIBILITY WHILE WORKING IN AN EXISTING STRUCTURE

    The conventional maximum transportation size for an assembly is 12m x 2.5m x 2.5m. This value is not applicable for all the conditions.

    TEK1 executed an alteration work inside Canberra airport. Everything that enters an airport must go through the checking / screening area. As per design, the size of assemblies were more than 9m & we were not sure whether these assemblies could be transported into the Airport. So, TEK1 raised a query regarding this. The client agreed to reduce the size of transported assemblies.

    Lesson: Whenever a work is carried out inside an existing building, consideration must be given for taking in the assemblies i.e. door/entrance size is mandatory. Since a completed airport terminal is a closed roof structure, cranes cannot be used for erection. Here the erection is done with the help of genie lifts. Weight carrying capacity of the erection machinery must also be taken into consideration.

    See below design snap & TEK1 proposal markup for splice location.

    ABOVE SNAP TAKEN FROM STRUCT DESIGN. SHOWN ASSEMBLY SPLICE LOCATION AS 9300 mm.

    PLEASE REFER BELOW SNAP WHICH SHOWS PROPOSAL MADE FROM TEK1 & THAT WAS APPROVED BY STRUCT ENGINEER.

  • Trimble Connect- Creating ToDos [Ep-5]

    Raising RFIs in the project has been made much easier by the use of ToDos. Creating a ToDo and assigning it to a particular person in the project and following it up till the closure of the RFI  is possible now which will greatly help in tracking the project queries and taking quick actions. A video on how the ToDo is created has been uploaded.

  • Trimble Connect- Markups and Views Creation [Ep-4]

    Markups can be done directly on the models and views based on the markups are created. The created views containing the markups can be later reviewed by any user in the project. The video on how to do markups and create views has been attached for reference.

  • Trimble Connect- Viewing and Hiding Objects [Ep-3]

    Viewing of Objects by overlaying the drawings over the IFC model has been an added advantage. The GA Drawings which are exported to Trimble Connect by taking model co-ordinates as origin will be easier to overlay on the IFC Models. It can be either hidden or viewed by selecting the required view. A video on how to view and hide the objects and drawings has been uploaded.


  • Trimble Connect-Connecting with Clients [Ep-2]

    Once a trimble connect invite for a particular project has been received, kindly follow the below steps,

    • Click on the view project option in the invite mail.

    • If the mail id to which the invite has been sent is not signed up in Trimble Connect, then kindly create an account in Trimble Connect using the same and then try logging in to view the project.

    • Once you sign in using your account and try viewing the project, you might have this screen pop up.

    • You can continue as a free user as long as Trimble Connect keeps this option active.
    • Once this personal user access gets disabled you can request to share a license from us.

    Sharing license with external users makes it easier to collaborate the models with the clients. The process about how to accept the external user license has been shown in the video.

  • Trimble Connect – The powerful collaboration [Ep-1]

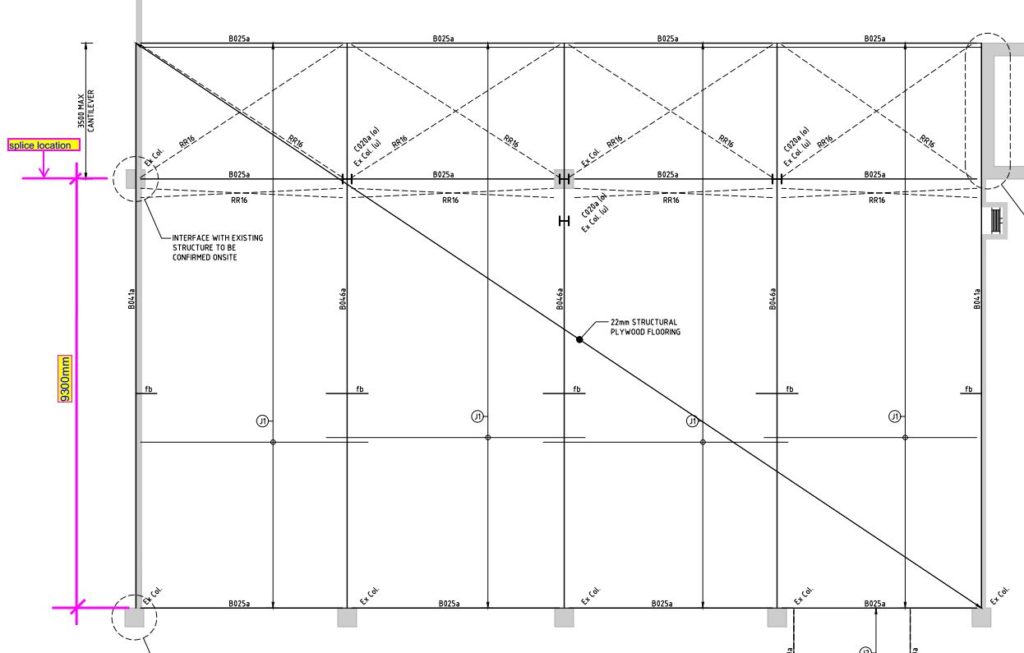
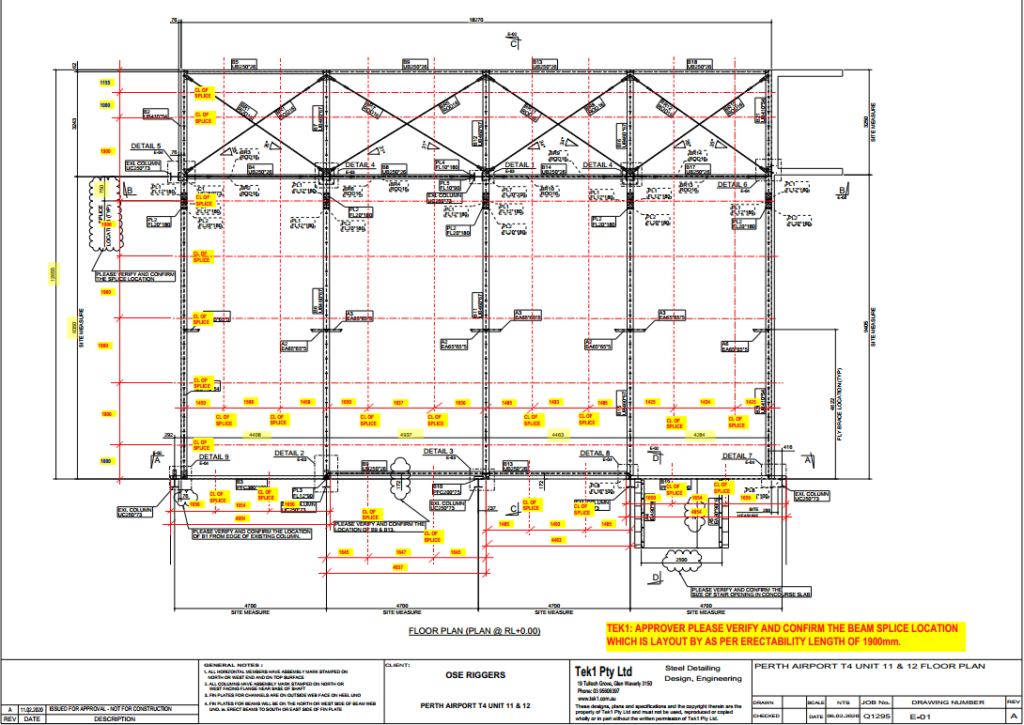
    Trimble Connect is a powerful collaboration tool for Architecture, Engineering and Construction (AEC) Professionals including the Architects, Engineers, Detailers, Sub contractores, General Contractors and Project owners. This tool helps in collaborating the models among all the members of the project. This tool makes the project information accessible, transparent and traceable and to help users to build better.

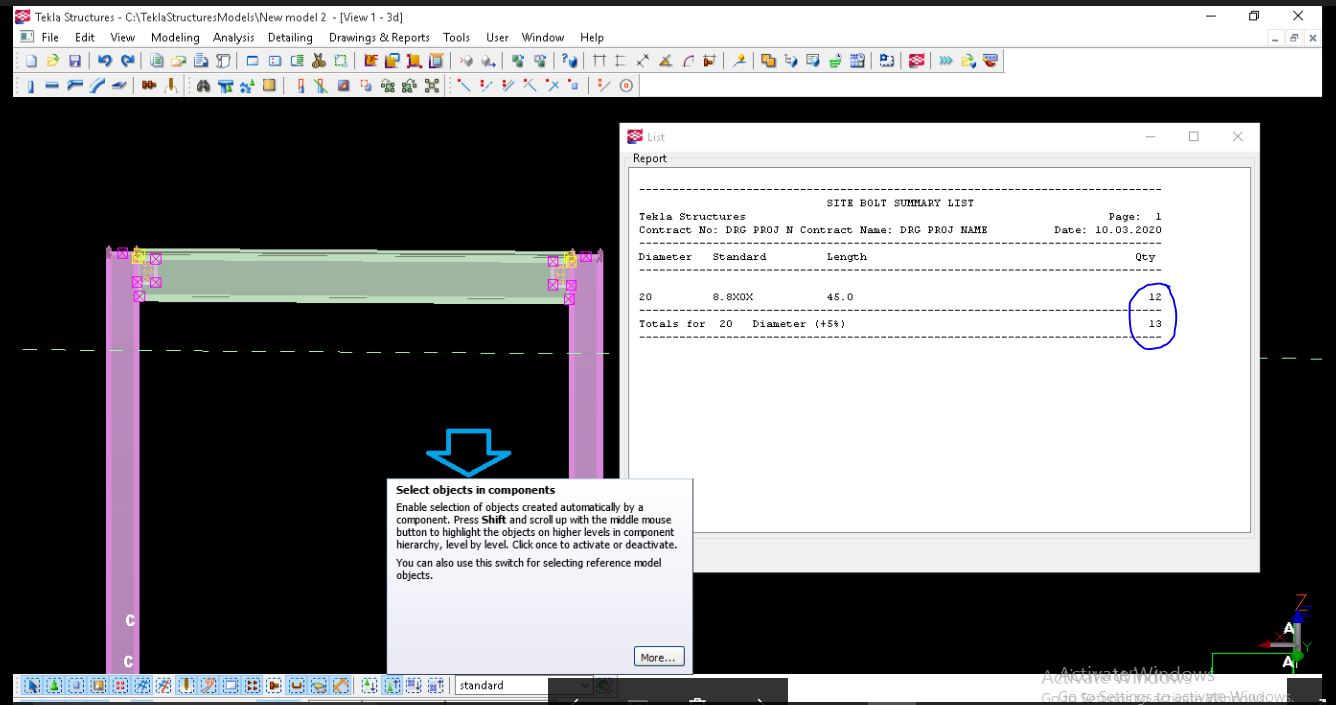
    It keeps everyone in the hierarchy of the project updated about the progress and the next course of action. Trimble Connect accessibility via the web, desktop and mobile devices makes it userfriendly to share, view and access construction project data anywhere and anytime. Some of its main features include an activity feed, align models, export reports, create a project, coment on to-dos, file explorer, model object filtering and clash detection.

    TRIMBLE CONNECT FEATURES :

    • 3D markup

    • Align models

    • Activity Feed

    • Comment on to-dos

    • Combine and view selected models

    • Change color of some objects

    • Control visibility of entire model

    • Create a project

    • Define custom reports

    • Create and manage folders

    • Create and manage releases

    • Exchange to-dos using BCF 1.0

    • Export reports

    • File Explorer

    • Manage permissions and notifications

    • Model object filterin

    • Manage users and groups

    • Save views

    • Run clash checking

    • View/comment clashes

    • Temporary local offline storage

    Let us see how we are going to collaborate using Trimble Connect in upcoming blogs. Follow the blog updates regularly for more Trimble Connect videos.

  • Selection method for Reports Creation in Tekla

    While creating reports in Tekla Always ensure that selection men must be in objects selection. See below snaps

    OBJECTS SELECTION 

    COMPONENT SELECTION

    Above snaps clearly states reports must be taken while the members selected in objects selection option is turned on. Otherwise the report quantity will be less than the actual quantity.


  • HAVE YOU TRIED IN AUTO CAD #2: CREATING CUSTOMIZED NEW RIBBON

    We do use a set of commands frequently, in those case we used to switch between using mouse and keyboard. if we try to click on the icons on the default ribbon we need to search them every time.

    Auto cad has provided with an awesome facility that we could customize a ribbon in our work space, while customizing a ribbon we could just select the tools which we need and we could have a personal ribbon.

    Procedure:

    1. we could use the CUI command to enter into the “Customized user interface” dialog box.
    2. In customize tab, we need to create a ribbon. So, select the + symbol near the ribbon. Here we have two options tabs and panels.
      Tabs: it is the header of the ribbon and they can have number of panels into them.
      Panel: They were the header of a group which has number of tools.
    3. We first need to create a panel by just right clicking the name panels then new panels and name your custom panel.
    4. In the list of commands list which is available below select the command and drag and drop it into the panel rows.
    5. We could create Tabs by right click and name it.
    6. Once we have created all the panels we need to drag and drop them into the tab we have created.
    7. We could assign this ribbon to work space to have our own customized sets of tools in a single ribbon.
    8. we could use the combinations of existing tabs in our ribbon as well.

    We could also customize our work space.