This means that they they can only be transported outside business hours – big trucks will slow down traffic.
Also you need a special crane to lift such large beams into place. They ain’t cheap: $600 per hour. And remember, you cannot just hire it for one hour, you have to hire it for an entire day / week.
If there’s a problem with the cleat, then you might find it difficult to fix on site. This means you have to bring the beam back down to the ground. Where are you gonna keep it?
Are you going to send the truck away? Of course not – you’ll need the truck.
And you’ll need the crane for an extra day.
And you’ll need to pay overtime rates.
……..so the question is, if something goes wrong, who’s carrying the can?
What should you do?
Make sure everyone’s on the same page. Seek an approval from the engineer. When everything’s fine, then party keeps going. But when there’s a mistake, and huge costs, and liquidated damanges, fingers will be pointed.
Addressing Design Discrepancies in Fixing Timber Wall to Steel Structures: An RFI Necessity
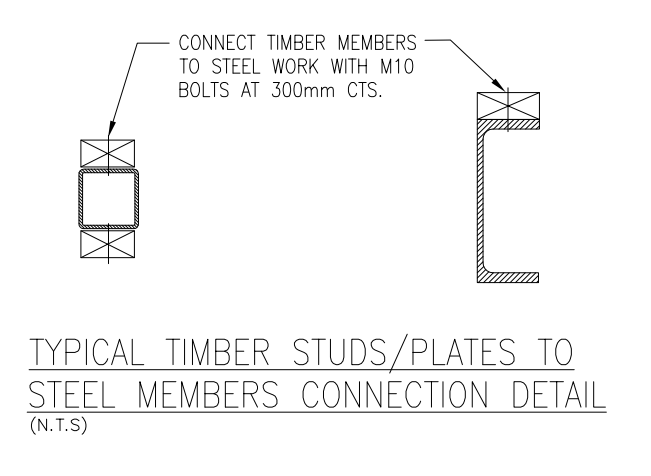
When it comes to construction projects, precision and adherence to design specifications are critical. However, sometimes, practical considerations highlight the need for adjustments to those specifications. One such scenario involves the fixing of a timber wall to steel SHS columns and beams, where the original design calls for M12 bolts spaced 300 mm on centers.
The Issue with 300 mm Spacing
While the design specifies M12 bolts at 300 mm centers, this spacing is notably narrow for this type of application. Typically, such close spacing is reserved for situations where exceptional load-bearing capacity or additional structural support is required. In this context, a spacing of 600 mm on centers would be more than sufficient to secure the timber wall effectively, without compromising structural integrity.
The concern with the 300 mm spacing is not just overengineering but also the practical implications on the job site. Implementing such close spacing requires more materials, labor, and time, leading to increased costs and potential delays. Moreover, drilling excessive holes into steel SHS columns for fixing purposes could weaken the structural integrity of the columns, which is an outcome that must be avoided.
Alternative Solution: Gun-Fixing the Studs
Given that the primary objective is to secure the timber wall to the steel structure, an alternative approach could be considered. Gun-fixing the timber studs directly onto the steel columns, without the need for drilled holes, is a viable option. This method is not only faster but also maintains the strength of the steel columns by avoiding unnecessary perforations.
Raising the Issue: The Importance of an RFI
Before proceeding with the job, it is essential to address this issue through a Request for Information (RFI). An RFI will formally document the concern regarding the overly narrow bolt spacing and propose the alternative method of gun-fixing. By raising an RFI, the project team can seek clarification and approval from the design engineers or the client to adjust the specifications accordingly.
This step ensures that all parties are aligned, and any modifications to the original design are officially approved, reducing the risk of rework or disputes later in the project. It also demonstrates due diligence and a commitment to delivering a project that is both cost-effective and structurally sound.
Conclusion
In summary, while the original design calls for M12 bolts at 300 mm on centers to fix the timber wall to steel SHS columns and beams, this spacing is unnecessarily narrow. A 600 mm spacing would be sufficient, and an alternative method of gun-fixing the studs to the columns should be considered. Before commencing work, this issue must be addressed via an RFI to ensure that all stakeholders are in agreement and that the project proceeds smoothly and efficiently.
…. and remember: concrete is NEVER where it should be. It is NEVER poured correctly. When concrete is involved, you will typically need site measurements.
Key Issues:
Engineers and architects often make mistakes,
and/or present unworkable designs
or expensive / complicated details.
……..they are not an authority figure.
You must question everything they suggest.
Everything you see must pass the “smell test”.
Do not put something ridiculous on the drawings simply because the engineer wrote it on HIS drawing.
Your job is to apply your judgment to the engineering and architectural drawings and produce something which can be built quickly and efficiently by your clients.
If you see an engineering design that is questionable, you must question it:
DO NOT ever say to your client: “but it was on the engineering drawings”
Today marks the day we are completely moving away from the “hourly” billing model. In other words, we are no longer billing clients “by the hour”.
Secondly we are fully exposing our pricing to our staff.
Why?
Because client do not care how long it takes for you to do something. Whether it takes 10 hours vs 12 hours is irrelevant to them: all the client cares about is cost, and quality, and value.
Client do not pay for hours. They pay for solutions.
Clients want solutions NOW, rather than 10 hours later. So if you can give them something valuable NOW, then charge for it!
And the ironic thing? We always quoted fixed prices
We never billed by hours. We always quoted fixed prices, but the problem was that we rationalised those prices in terms of hours. I felt that clients often got confused when they saw “hours” on the “approval emails” versus rationalising them as fixed costs. I also felt that they may have gotten them confused with those prices as being estimates. Our latest policy change makes everything explicit.
Occasionally, some clients argued that the “hours” were “too expensive”………. Most clients, initially did not appreciate the value of this model. All of our clients now do. There were two who did not – they are no longer our clients. We amicably parted.
e.g. if we charged our client $1000 and then reasoned to the client: “but we took 10 hours” then that would average out to be “$100 / hour” which might be acceptable to the client. However, if it took us 5 minutes, because we had a special tool to speed up the process, then how should we charge our client? For 5 minutes? No we should perhaps charge at least $1000 plus a premium for delivering it super fast. Clients value speed, especially if an entire workforce is sitting on the factory floor, twiddling their thumbs.
It prevents arguments. I have wasted so much time with clients arguing and haggling endlessly about $100. No more. Once we put the price, then that is the price. There are no hours to haggle over anymore.
Exposing Prices
Our leadership always felt apprehensive about exposing pricing to staff. Why? Because staff may not appreciate the huge costs associated with running a going concern operation. For example, $100 entails: taxes, exchange rates, licenses, cloud services, and significant administration costs. Staff do not see that cost. But they may think that “they are getting ripped off”. Nothing could be further from the truth.
We’re going Fixed Pricing All the Way
….and we’re completely getting out of the business of mentioning hours.
Is it a risk? Yes.
Is it a big risk? No.
What should you do?
Normally you would quote your hours on the “cost justifications” field:
Break down of hours: why so many?
Time required for model amendment: 3 Hour
Time required for GA drawings: 1.5 Hour
Time required for assembly drawings: 1.5 Hour
Total Variation Claim: 6 Hours
We are not going to be doing this any more. So do exactly what you did above, but remove the hours quoted:
Cost Justification
model amendment.
GA drawings amendment.
assembly drawings amendment.
Checking of everything.
Notice how we do not mention hours anymore?
Lastly, you must still enter the hours you take. But note – we are no longer exposing this to clients:
When working with elements like cladding plates, balustrade infills, decorative panels, and chequer plates, the approach to modelling them differs significantly from that used for standard structural plates. Ensuring accuracy in these cases hinges on a thorough understanding of working points and the rotation property, which are essential for ensuring the correct orientation of the visible side when generating drawings or DXF files.
Understanding the Critical Role of Working Points
It might seem simple to assume that these sheets can be flipped or rotated as needed after they are cut. However, this is a common misconception that can lead to significant errors during fabrication. The key to avoiding such issues lies in setting up the working points correctly, particularly when dealing with intricate designs or surface finishes.
The Importance of Proper Rotation
Take a stair panel, for example. If the panel features any patterns or surface differences, the working point must run in the direction from left to right when facing the stair panel. Additionally, the rotation must be set to either “top” or “front”—never “bottom” or “back.” This ensures that the visible side of the panel is correctly positioned.
Symmetry Doesn’t Eliminate the Need for Attention
Even in cases where the pattern is symmetrical or there appears to be no pattern at all, the orientation of the face of the sheet is crucial. It’s easy to think that since the machine will cut the plate according to the DXF file, it doesn’t matter how the drawing is flipped or rotated. However, this is where problems can arise.
Avoiding Aesthetic Imperfections
During the cutting process, the machine can leave minor marks on the material. These marks are typically left on the non-visible side of the sheet. Therefore, it’s critical to feed the sheet into the machine with the correct side facing outwards. If not, the marks could end up on the visible side, compromising the aesthetics of the final product.
Conclusion: Precision is Key to Quality
Proper modelling and careful consideration of working points and rotation properties are essential when dealing with cladding plates, balustrade infills, decorative panels, and chequer plates. By ensuring the visible side is correctly oriented from the start, you can avoid costly mistakes and ensure a high-quality finish.
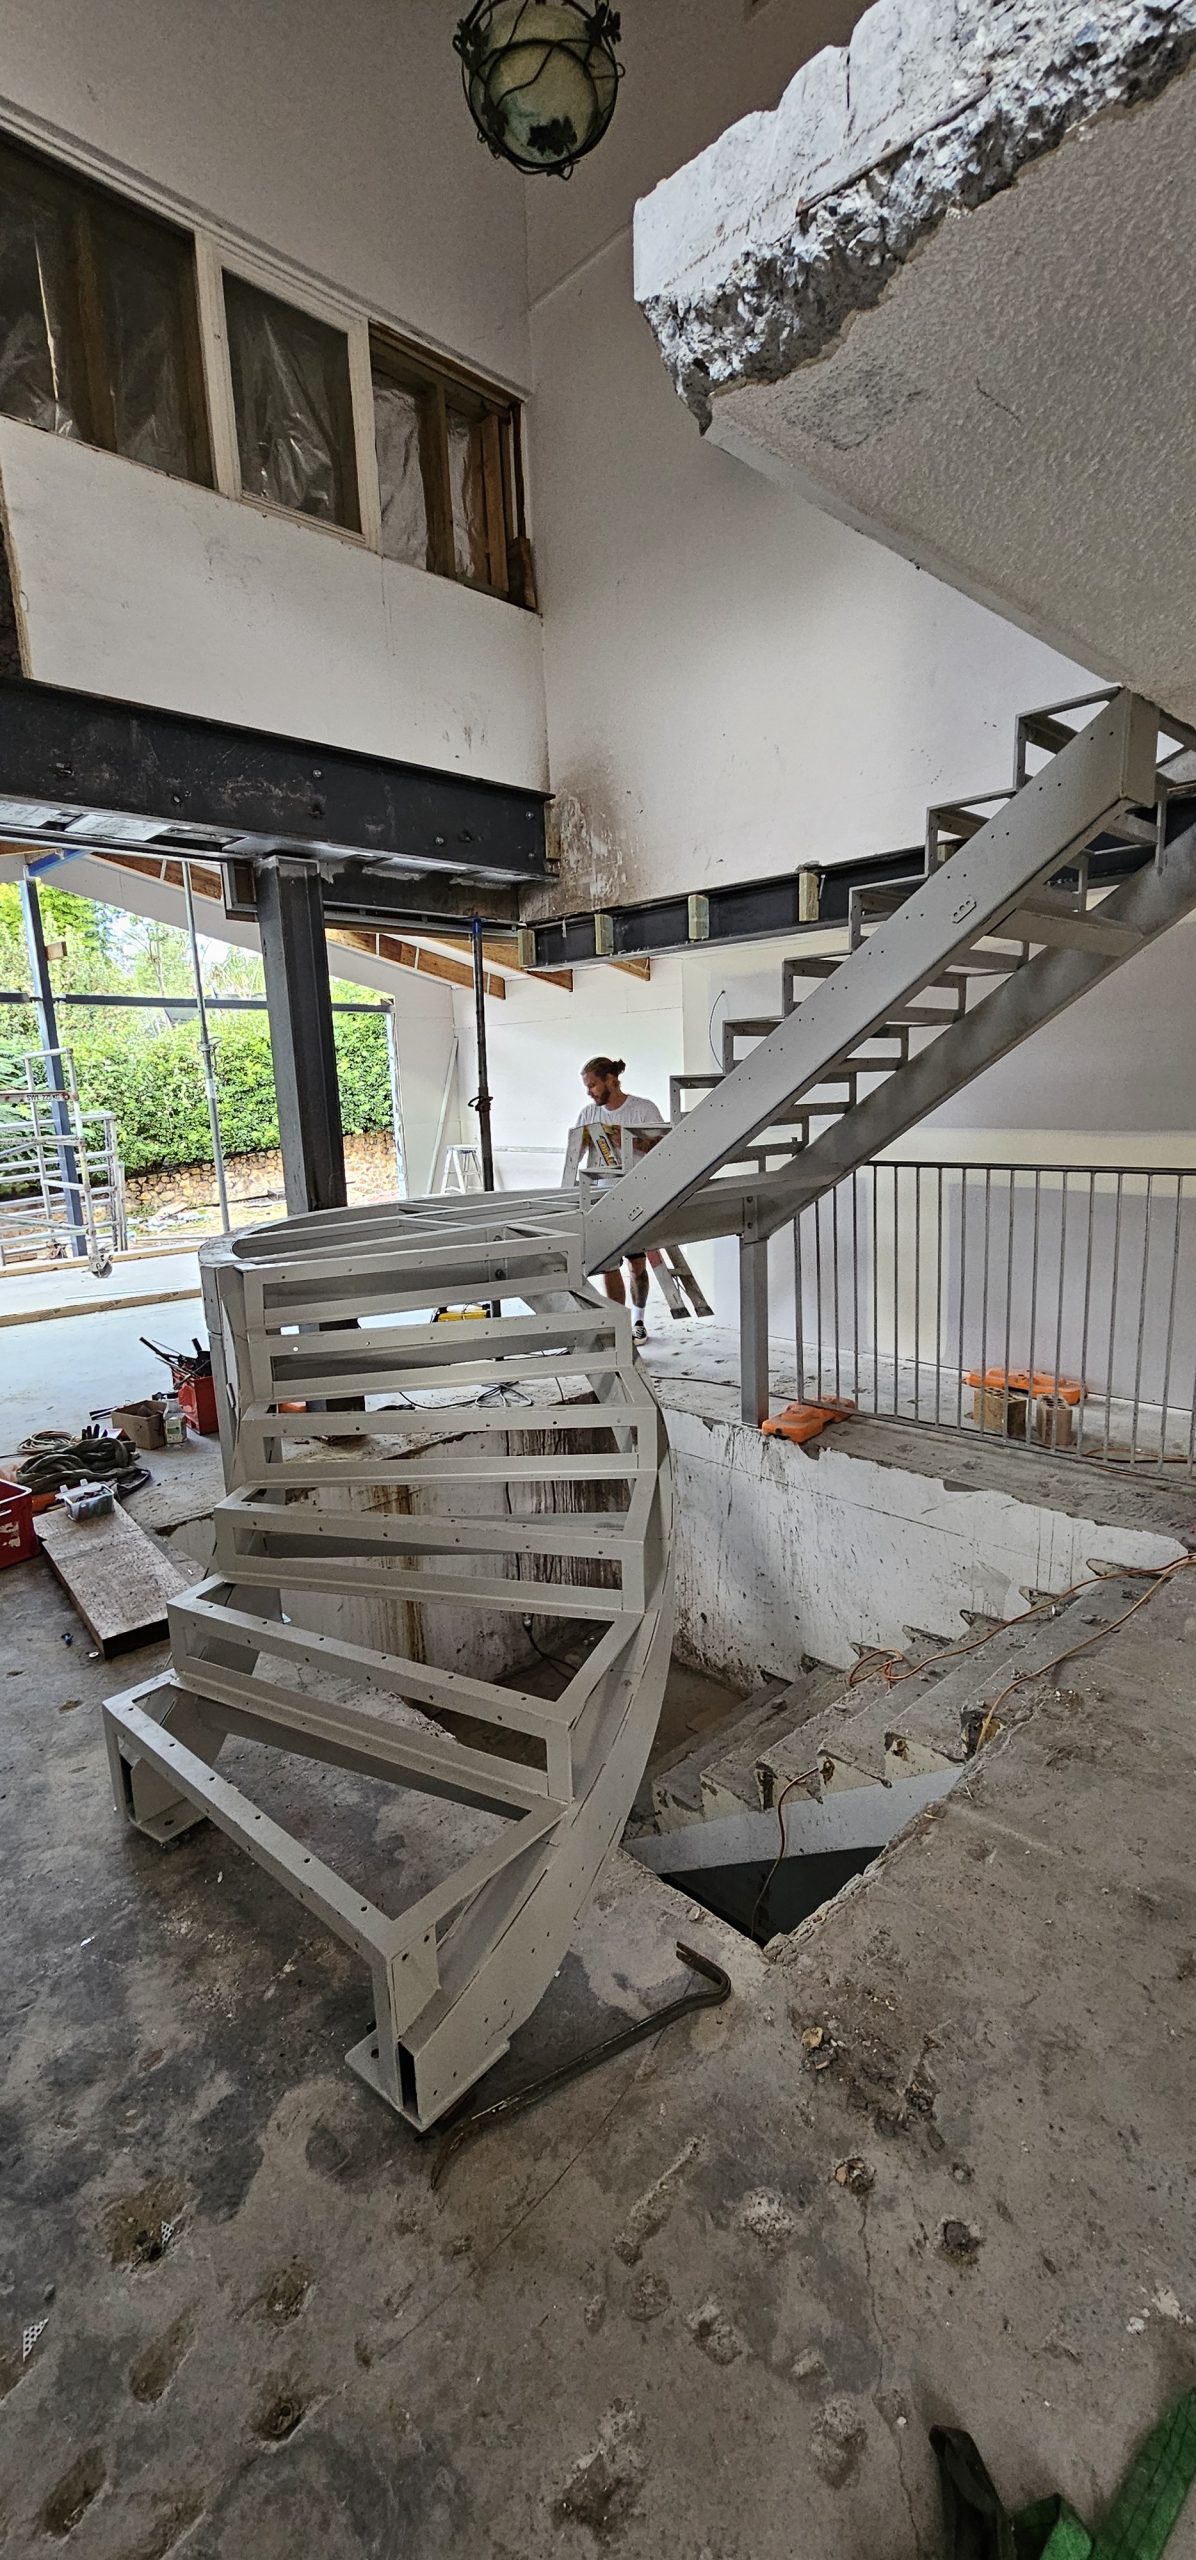
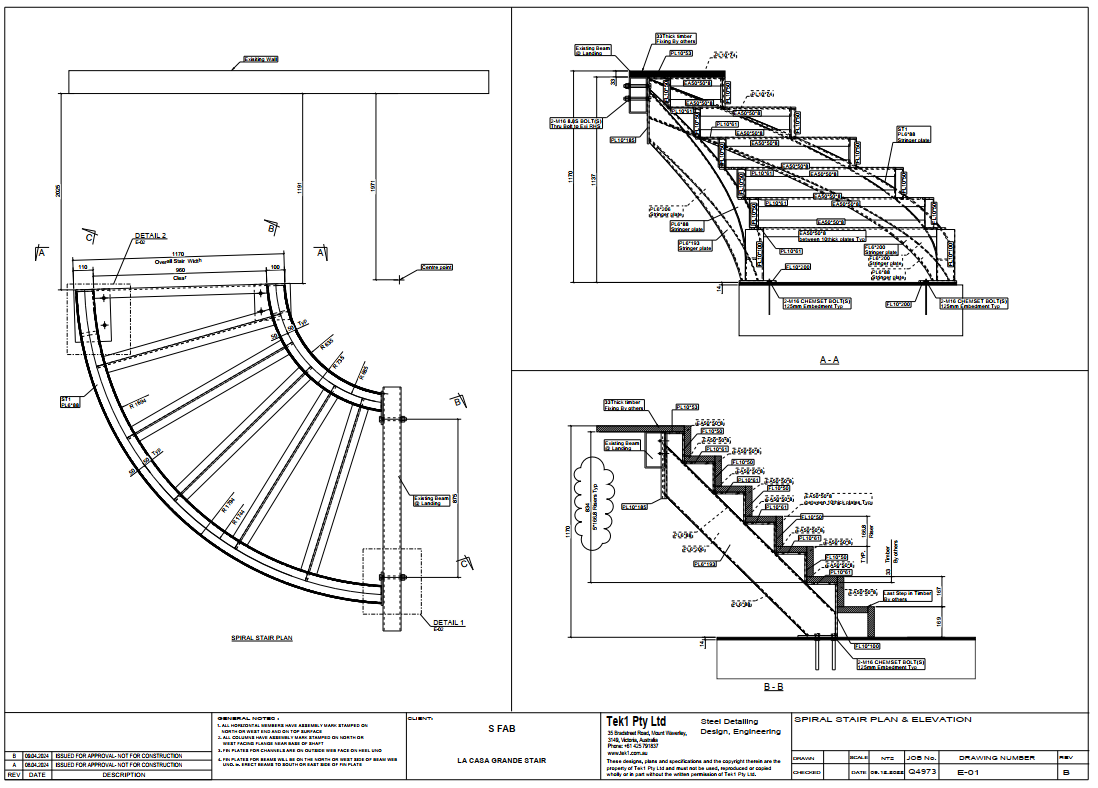
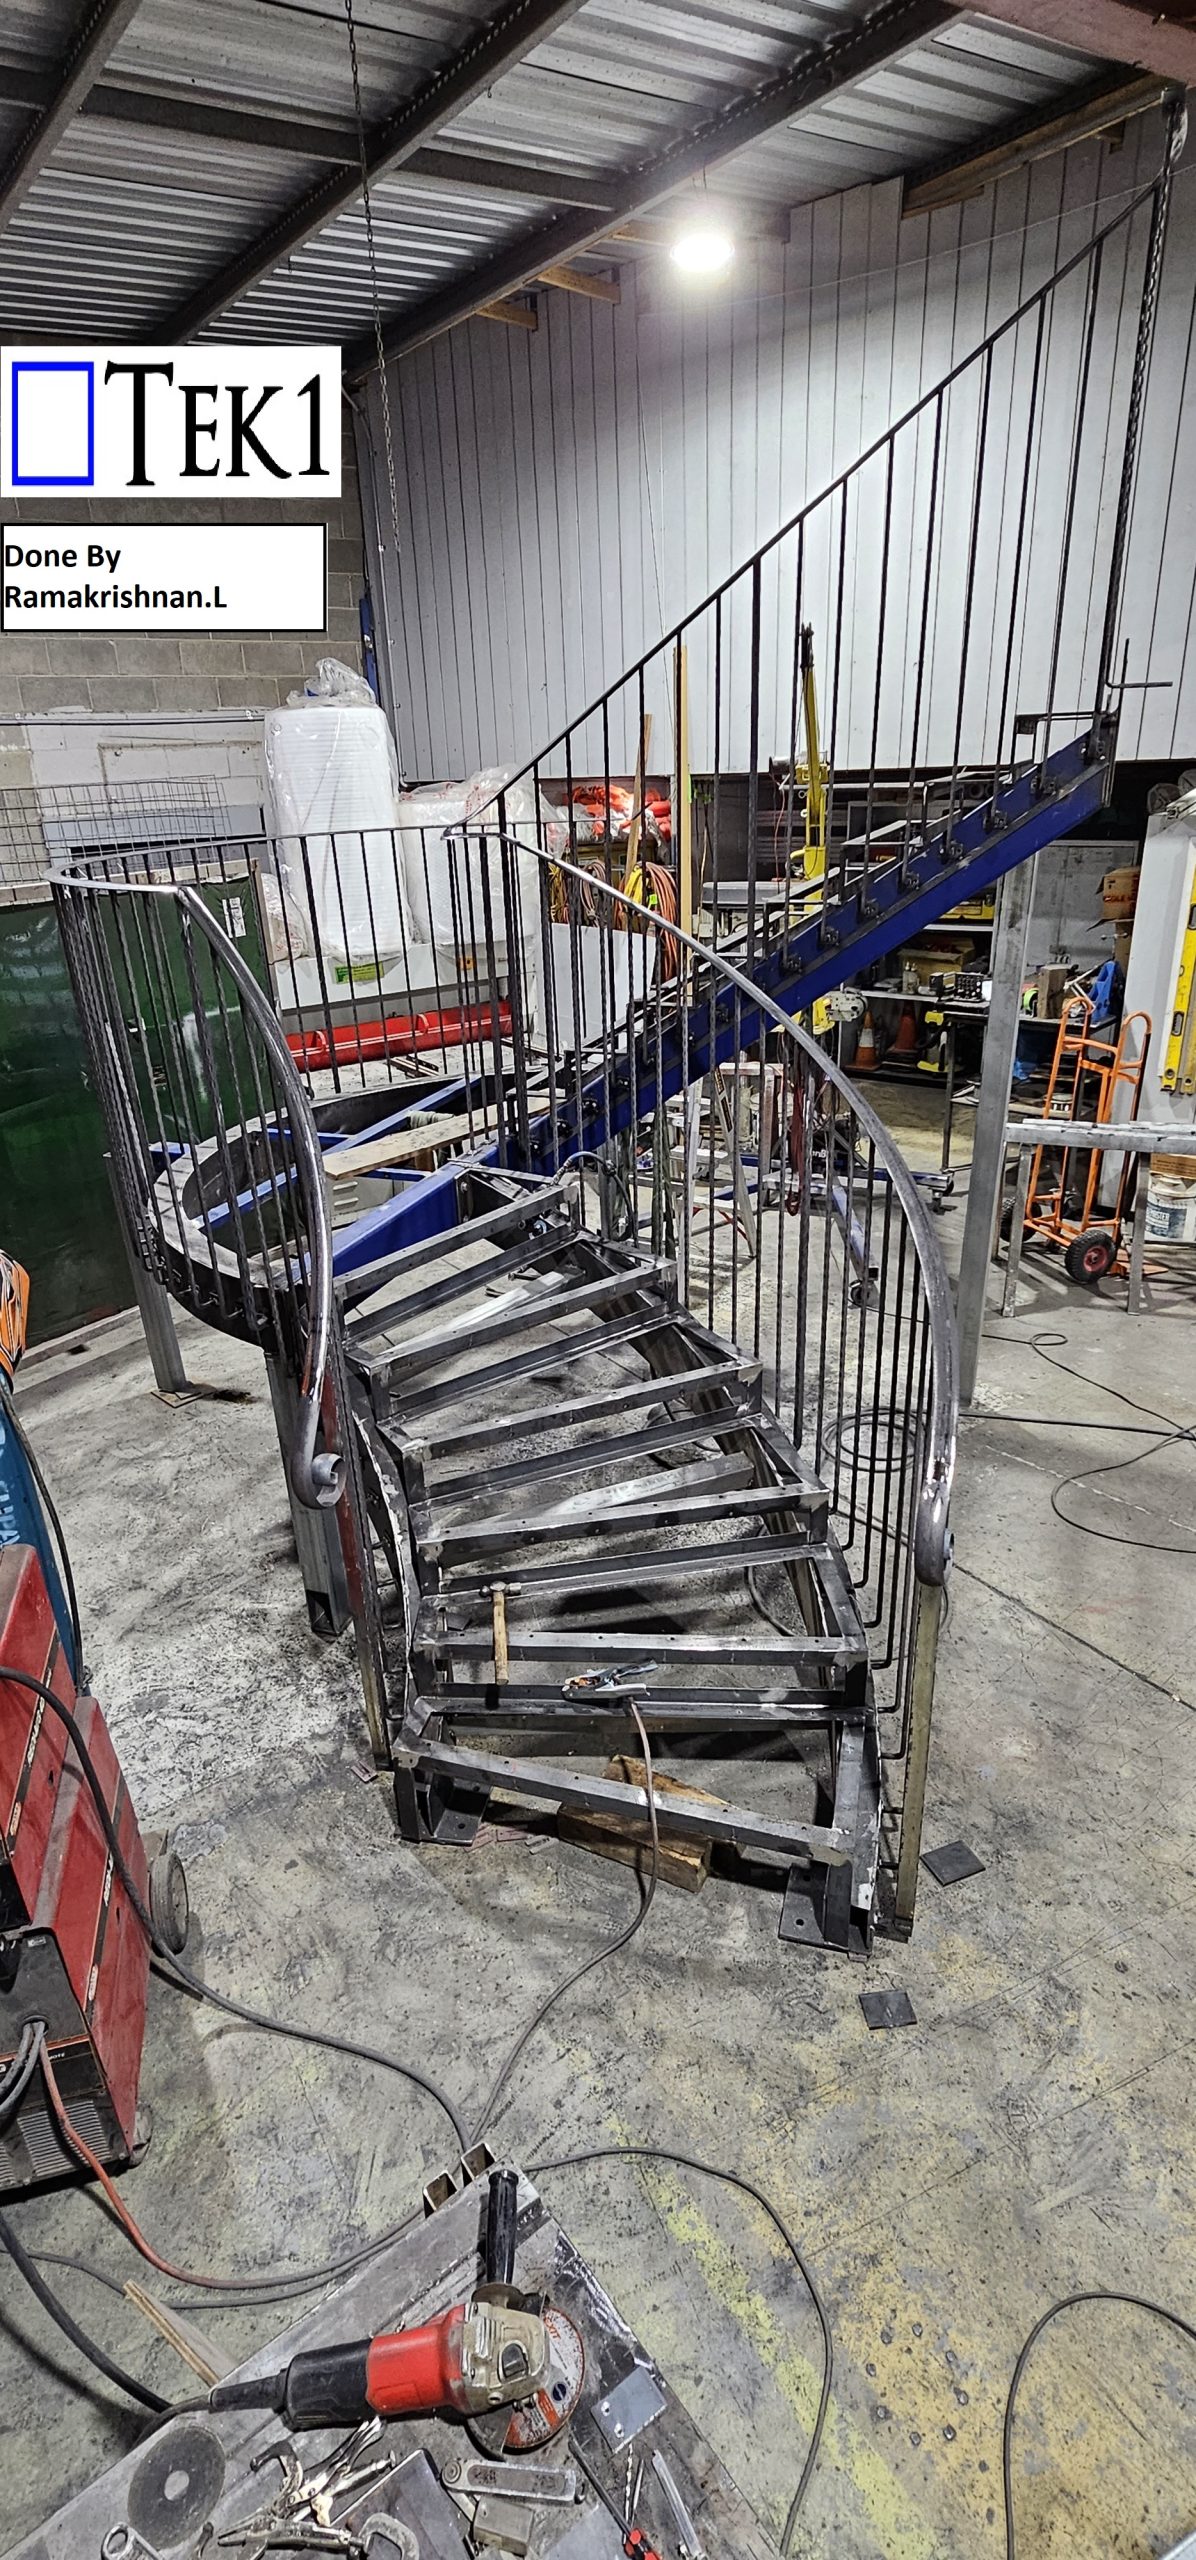
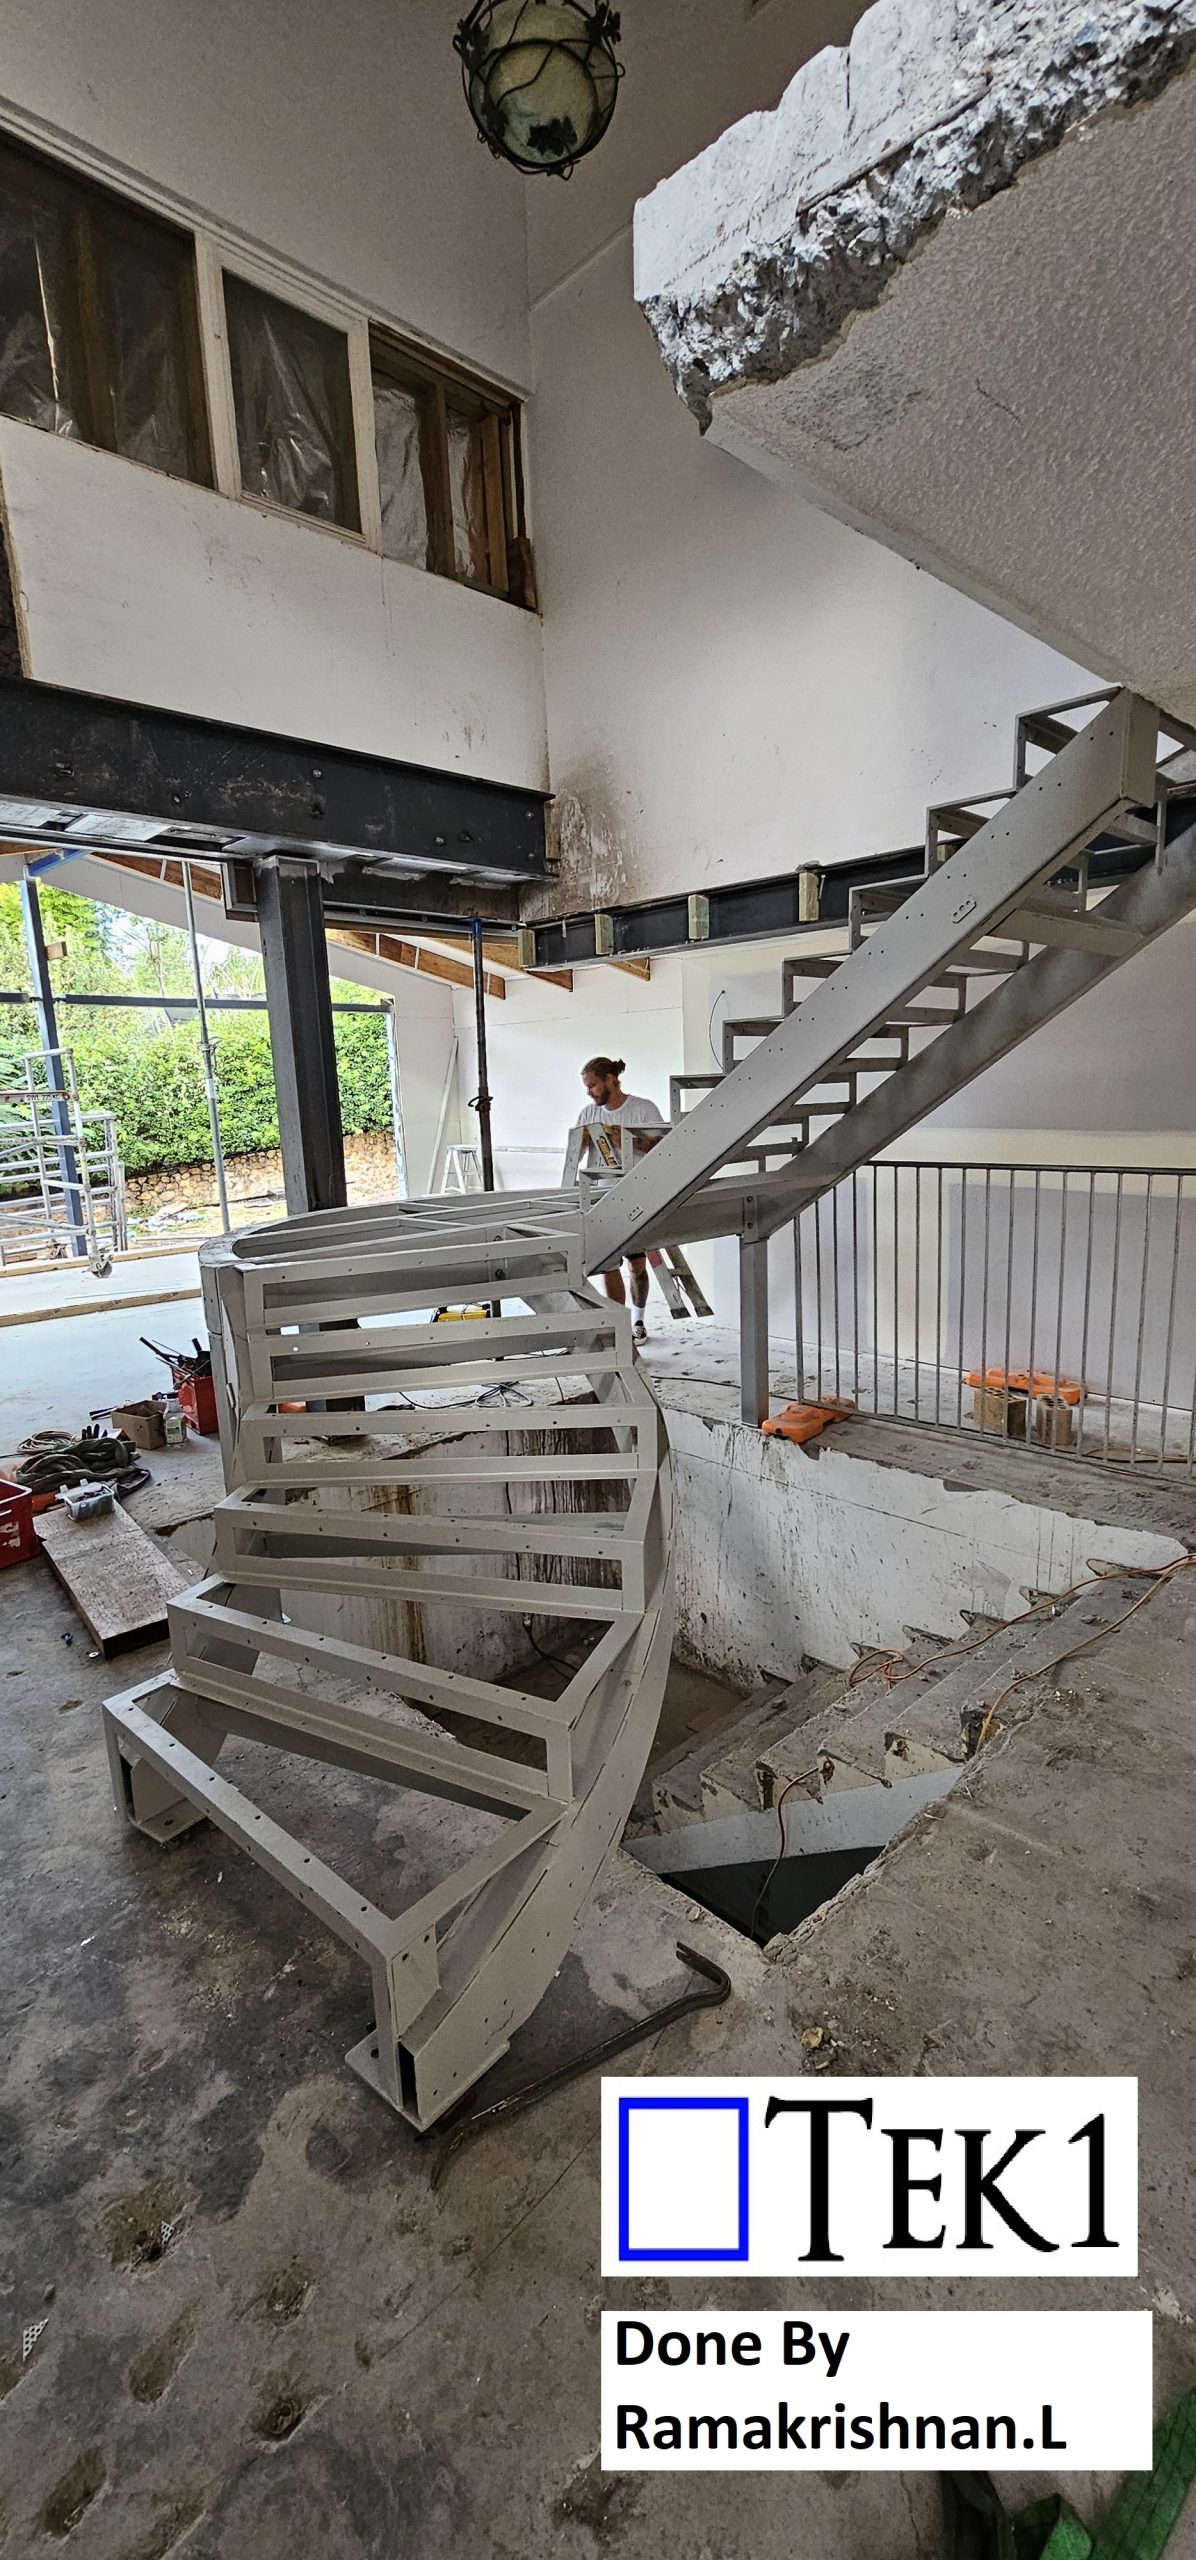
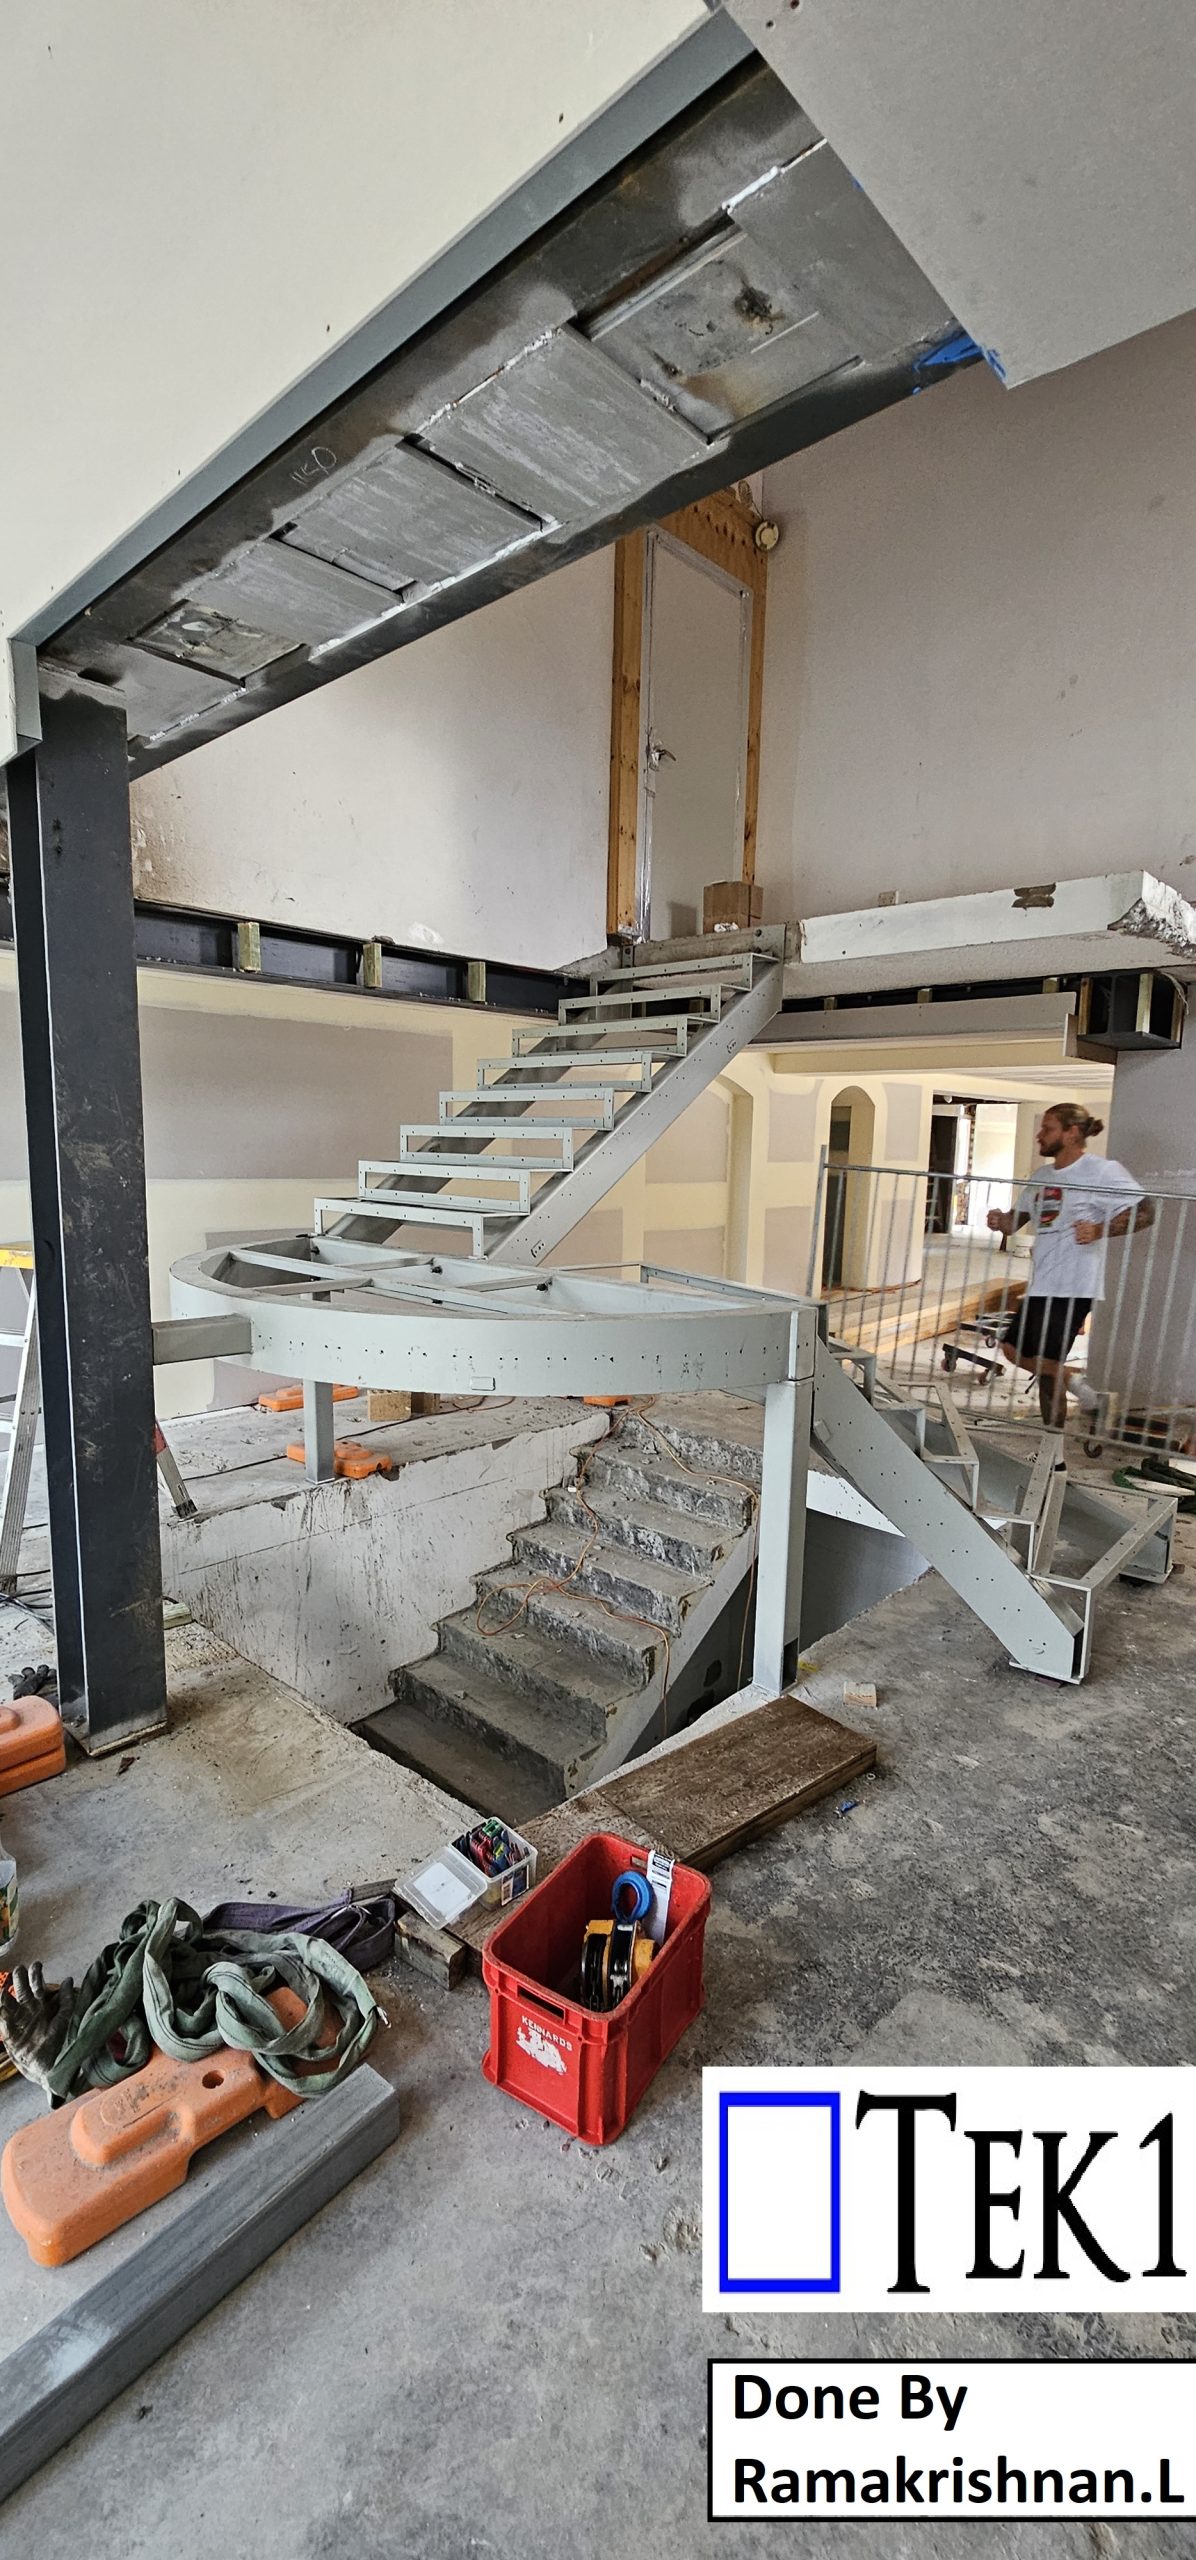
We are pleased to inform you that TEK1 has accepted the task of detailing the spiral plate-formed RHS stringer stair as requested by our client. Our team is well-equipped to handle this design, ensuring that all details meet the highest standards.
At TEK1, we have consistently provided top-notch miscellaneous steel detailing services to our esteemed clients, adhering to all relevant codes and standards. We are committed to delivering precise and reliable shop drawings tailored to your needs.
Should you have any queries related to miscellaneous steel shop drawings, please do not hesitate to contact us. We will promptly provide you with the necessary answers and support.
For any steel shop drawings you require for an ongoing project, feel free to reach out to Koshy at (03) 9560 6397 or +61 3 9560 6397.