
Here is a sample of bridging list we provide with Take off. We provide the length and the quantity for accurate estimation. The model also shows the bridging.


Here is a sample of bridging list we provide with Take off. We provide the length and the quantity for accurate estimation. The model also shows the bridging.
Tekla provides a few tools for experts users. Careful study of model, diligence and discipline in placing members, Set up of template model makes it possible to use these tools with maximum efficiency.
These are the tools which will increase productivity with expertise.
These tools are good only with people who have a lot of experience, and who have access to our in house developed API tools for Autocad and Tekla.
Our clients will get the full advantage when they use us for detailing
Contour Marking: It is an information written in an NC file that passes information to the NC machine on the layout and the parts that are welded together.
Tek1 do care about every client so we thought of seeking the help of Trimble Connect warehouse and found an plugin suiting the criteria.
How the Convertor Works
The convertor converts all the NC files to DXF. By default it converts the members in Front View. To obtain the contour marks that are available at the back face few changes had to be done on the convertor setting for efficient changes.


SETTINGS TO CHANGE FOR EFFICIENT EXPORT
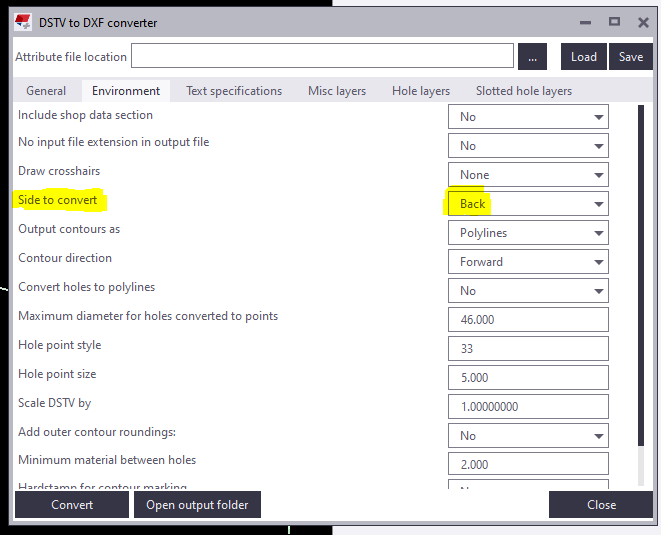
Change “side to convert” under Environment tab as Back in the convertor to create DXF with contour marks at Back view.
For plates if Back option is chosen you get DXF Files converted like below images. So few advanced settings has to be done.

For plates members follow the below steps:
1) Open the model folder
2) Create a new text document
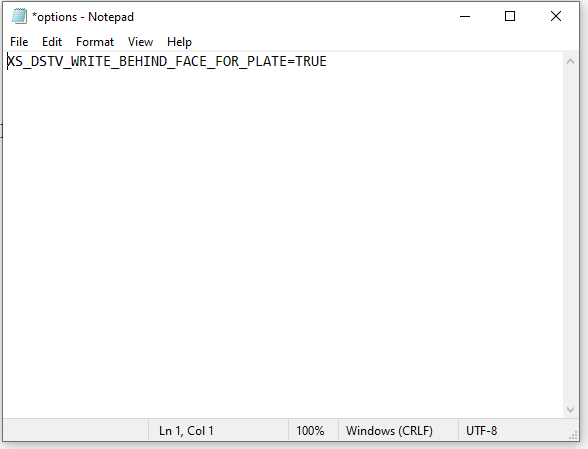
3) Type “XS_DSTV_WRITE_BEHIND_FACE_FOR_PLATE=TRUE“
4) Save the document as “options.ini“
Refer below snip for Clarity
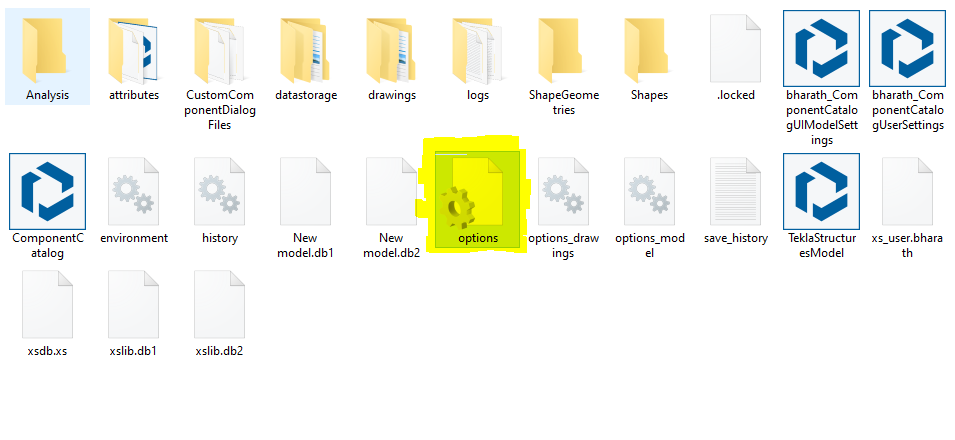
Now repeat the conversion the convertor works efficiently providing a quality output.
Refer Tekla Structure support link for detailed explanation of the convertor settings.
DSTV to DXF Converter | Tekla User Assistance
Bharath Nagarajan – Blogger
Tek1 Pvt Ltd
Core Competencies T1 & T2 – colored
Tekla Skills
See Video Tutorails Below: (I prefer Vimeo because you don’t have to deal with insufferable ads)
Sample Project files :
Solution for the project files :
Please find Vimeo link of tutorial videos : Tekla Tutorial For Beginners
Other Skills:
The following are tutorials done by Koshy:

The key to this is to specify a chamfer value, and at least three points using the PolyBeam class. You must also provide a profile type that Tekla understands – otherwise you’ll get a bunch of straight lines.
Here’s some basic code to get you started:
You should be able to easily import, into Tekla, any curved Beam you want. The principal requirements are: (i) start point, (ii) end point, and (iii) also rotation. Start point and end point and centre point – this will not do: you will also need a third vector if you are going down this route, and I feel that it needlessly complicated. This can be obtained via any any means: CSV files, or directly with Rhino APIs (this might require programming in both Tekla and Rhino).
It is best to control your data source
If you read our past blogs re: CSV files – everything is contingent on how it is obtained. If you have rubbish in, you get rubbish out. We worked extensively with a party on the Westgate Tunnel, who promised .CSV files, but then provided me with corrupt and inaccurate data points, and did not provide the data in the agreed upon format. This makes for headaches and recriminations — and ultimately dissatisfied customers — but what can you do if they provide you with rubbish data that you cannot verify? So if you’re going down the CSV file route — then you need to know how the CSV files are being produced, and that there are not mistakes in them: e.g. missing columns, nonsensical data values, and that they are being produced programmatically etc. or at the very least have excellent lines of communication with your client to resolve these types of issues. Controlling the data source obviates these problems.
Or another problem I faced – you’ve agreed on CSV files, but the format changes each time an update happens. Someone changes the name of a column header – or they give you a file with irrelevant stuff in there. Every time you have to manually edit something, you’re introducing the possibility of errors. All of this can be solved by controlling the data source.
The Devil is in the Details
Again, as with most things, they seem simple at first but the devil is in the details: you gotta tackle the problem of rotation and also profile mapping and weird gotchas in Tekla – that are not documented. Then another important thing to manage:
Revisions and changes
How are you gonna manage this? How are you going to document variation hours? Likely you might have to add IDs to each member. This will have to be incorporated into CSV files from the outset. Or if you have the Rhino model in hand — then you could just see what has been changed programmatically: (i) are they IDs all the same, and (ii) if so, have they been moved. Now this will entail persistence of an old model to be compared with a new model, and a form of documenting these changes. This takes extra time, extra programming, and extra documentation management.
By Ben Koshy
Here is a numbering Quiz for advance steel learners
I am adding this Tekla video to the tutorials.