Category: .net (c#)

I am going to post a series of articles which attempts to explain complicated ideas in a simple fashion.

  • Extracting Bolt Distances From Single Part Drawing Files With an Output In Excel – Part 1 (Tekla Open API)

    We want the bolt distances of all the single parts.
    We want the bolt distances of all the single parts.

    Every now and again we obtain a request from our readership to tackle a problem. If it is of general interest to the public and given our commitments we do sometimes oblige. Here is one such interesting problem. We will tackle this in three parts, and will focus on part 1 in this blog post.

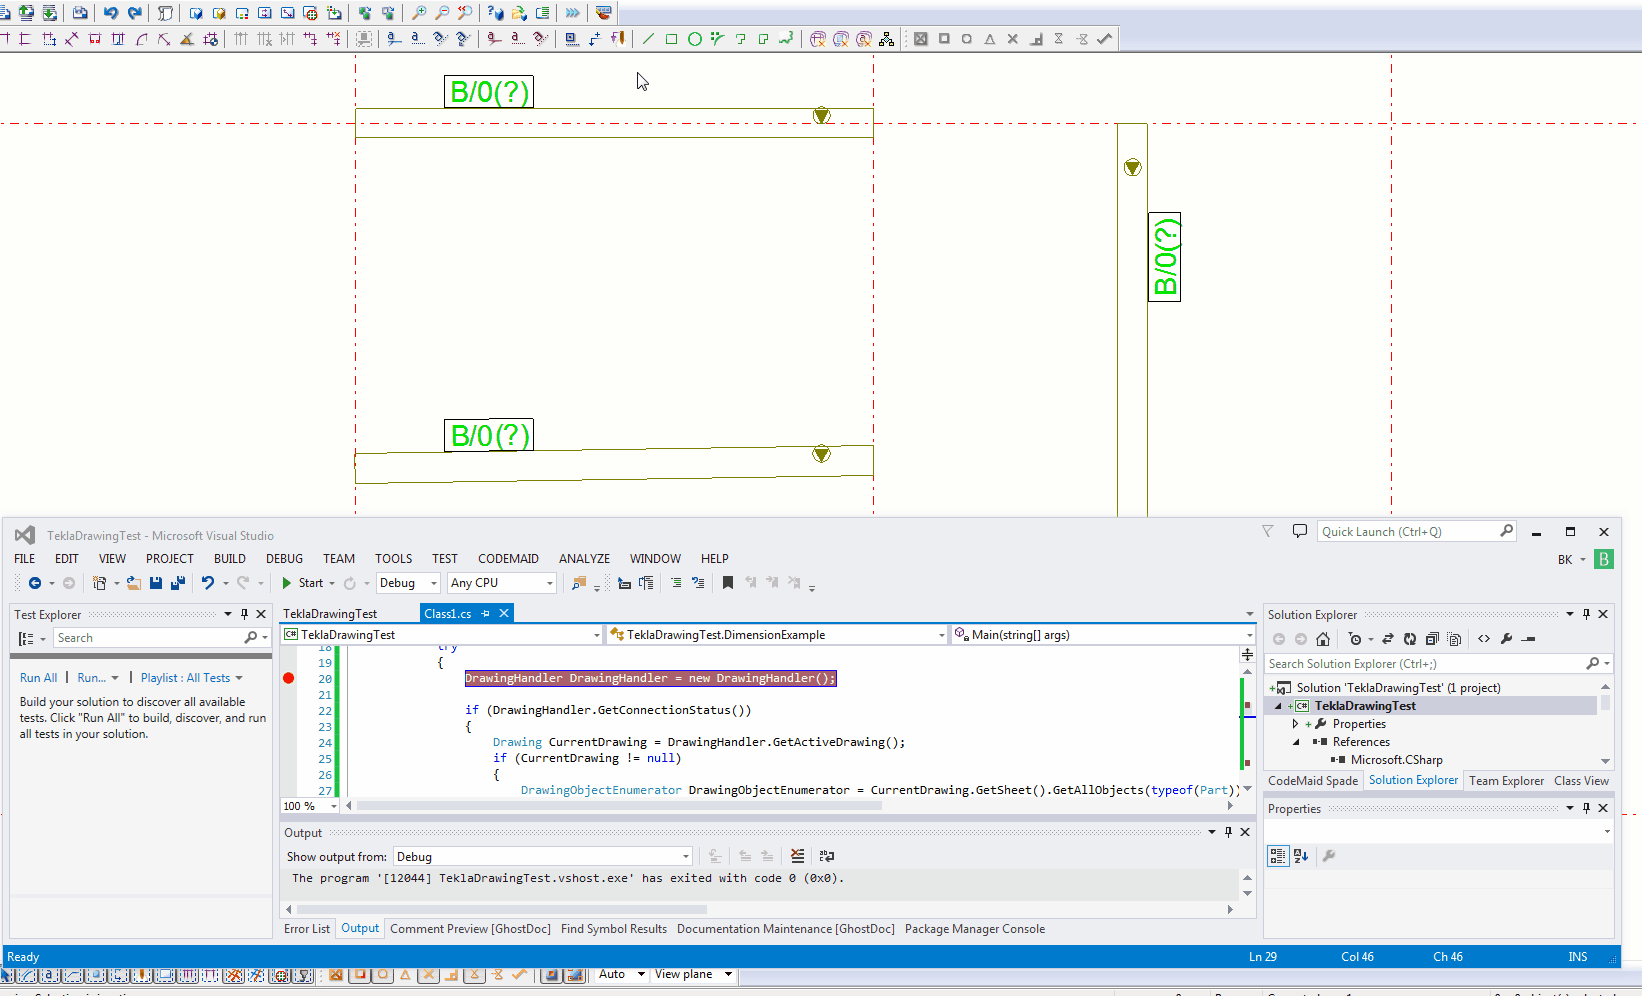
    1. Get every SinglePartDrawing which name starts with “HEA/IPE/CC”
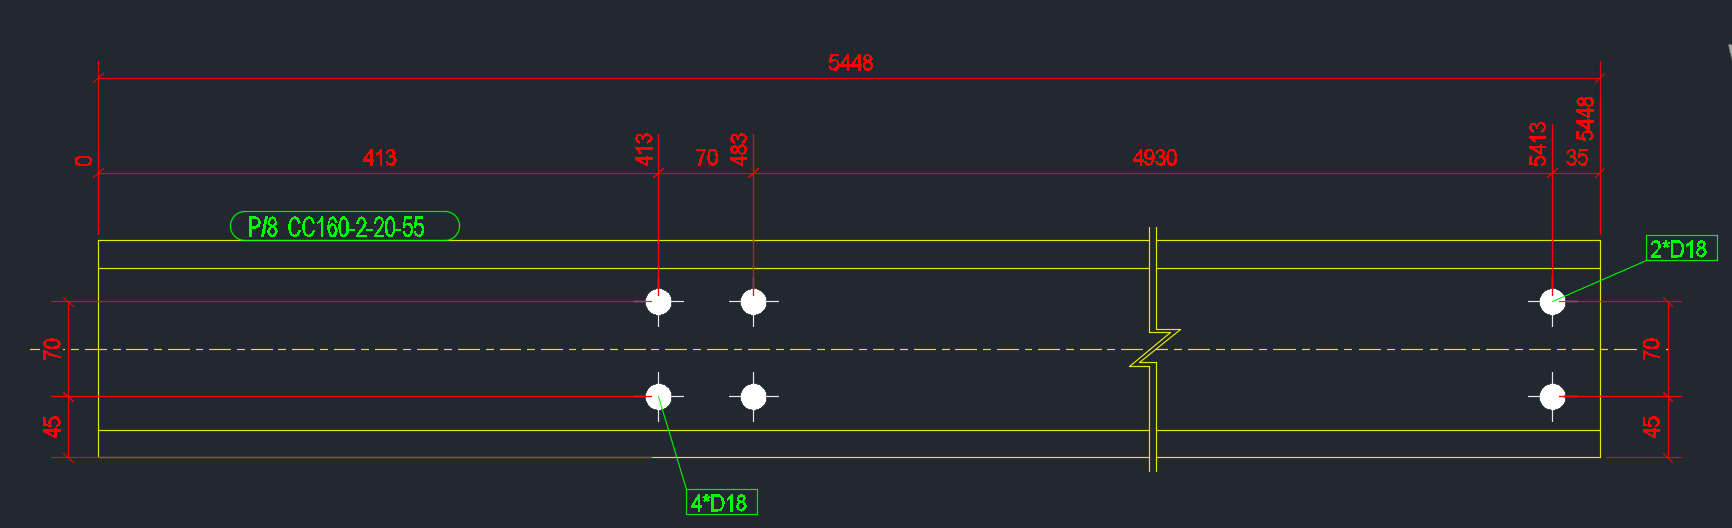
    2. Calculate the distance of every bolt distance from the start of the corresponding Single Part.
    3. Write the name of the Single Part and every bolt distance to Excel.
    4. Refactor the code.

    The first part is easy enough – and the code is pretty self-explanatory. We want to iterate through all the drawings and filter for the specific drawings that we are after.

    Here is the code:


    In the next part, we will look at obtaining the relevant parts that we want and calculating the bolt distances from the start and end points. And finally, we will look at refactoring the code, because it is a little slow, and also from a maintainability point of view.


    An Addendum

    • I was simply following the instructions of the question without inquiring too far into its purpose. If you actually want to extract NC information via the API – Tekla can very easily do this. But that was not the scope of this particular task – it was to deliver a very specific and peculiar set of requirements to a particular reader, but it is a topic which will be of general import to the public.
  • Getting Started In AutoCAD .net Development

    Wanna be startin' something?
    Wanna be startin’ something?

    Simply check out the following links:

    • My first plug in training:

    http://usa.autodesk.com/adsk/servlet/index?siteID=123112&id=18162797


    • Download the .net Wizards, and the other resources on the AutoDesk website.
    • Download Visual Studio https://www.visualstudio.com/vs/community/

    Handy resources:

    https://www.theswamp.org/index.php?topic=32381.0


    • Popular blog:

    http://through-the-interface.typepad.com/


    • Documentation:

    http://help.autodesk.com/view/ACD/2016/ENU/?guid=GUID-BA686431-C8BF-49F2-946E-9CEB2F7AE4FA

    http://help.autodesk.com/view/OARX/2018/ENU/

    Our own blog – with code snippets and case studies:

    https://www.tek1.com.au/category/autocaddotnetapi
  • How To Make Alternate Dimension Units Appear Below the Primary Units (AutoCAD .net API)

    Showing many different dimension styles.
    Showing many different dimension styles.

    This was a question which someone asked.

    I accordingly answered it with a code example. The answer is simple:

    Ensure that you add `“\X”` as a suffix to the `DimStyleTableRecord.Dimpost` property.

    Here is a code example:

  • Select Bolts From Tekla Model Based on its Tolerance using WPF (Tekla Open API) + Code Snippets + Video Demo

    Select bolts depending on their tolerance
    It’s not easy to find which bolt has a tolerance of 10 when you have 1000s of them in your model.
    You can really only do that type of thing with a tool.

    This is a repost from our sister site – I needn’t repeat it here, but it’s something that I’ve worked on, and which we hope to utilize to a greater degree when working with Tekla. Anyways, you can get the full blog post if you click this link here. Thank you for stopping by.

    Video Demonstration of Bolt Selector Tool

    Select Bolts From Tekla Model Based on its Tolerance using WPF (Tekla Open API) Video Demo from Tek1 on Vimeo.

  • Returning Inside Using Statements (AutoCAD .net API)

    WPF Databinding operations in the AutoCAD .NET API
    A demonstration of using a WPF User control to display information pertaining to missing and/or extra items within a panel, using the ComparePanels Command.


    While writing the above AutoCAD plug-in, I faced a small conundrum in the below code:

    • The question for you is: will the transaction be disposed of, and committed given I have returned the bool before it reaches the end of the using statement?

    Will it be disposed?

    The short answer is yes. The transaction object implements IDisposable. So, finally you can trust that the transaction will be disposed, and that any objects that it opens will also be similarly disposed.

    Will the transaction be committed?

    I had a peak into the Dispose methods using Reflector. I didn’t see any automatic committing of any transactions – so I am venturing to say that no, the transaction will not be committed. In other words, we’ll have to restructure the above code to ensure that the transaction is committed before we issue the returning statement. Perhaps the AutoDesk team should abort a transaction if it is not committed before a transaction is disposed?

    Summary

    So the lesson is: (i) always be sure your transaction is being committed, and (ii) a using statement obviates the need to ensure that your transaction is actually being disposed of.

  • Finding Blocks “Colliding” with Shear Lig Points (AutoCAD .net, Precast – Bubble Deck)

    Showing Blocks Close To Shear Lig Points

    It’s a common problem apparently. There are far too many block references placed a little too close to those pesky shear lig points. It takes discipline, but when you have 5-10 people all working on the same drawing, with different practices, it’s something that’s really easy to miss, but really expensive to discover.

    So I developed a tool to take care of it.

    Here is the video demo:

    Checks for Clashes against Shear Lig Points from Tek1 on Vimeo.

    Thanks for stopping by!

  • How to insert Reference Models into Tekla

    Wouldn’t it be handy if we could pro grammatically insert reference models into Tekla? Well you can now do so quite easily. And if you want to see a video demonstration, here it is:

    Here is the code which does the hard work. (You will of course add the appropriate references and directives):

  • Adding a Dimension to a Beam – Drawing – (Tekla Open API Tutorial)

    This is an example of a hello world program which dimensions a beam. I found this code in the Tekla Drawing Samples folder.

    You can see it in action here:

    How to dimension a beam using the Tekla Open API (c#)
    How to dimension a beam using the Tekla Open API (c#)


    Let’s walk through it:

    1. We have to get the relevant drawing.
    2. Then we have to get the relevant part we want to dimension.
    3. Then we get the view associated with the part.
    4. We save our current transformation plane, and we set a new transformation plane to the particular view’s display coordinate system.
    5. From here, get the part’s identifier and we select the ModelObject in the model itself – to get the relevant coordinates of the Beam we want to dimension.
    6. Once we’ve used the identifier to get the Beam we are after, and to get it’s relevant parts then we create the dimension.
    7. Remember to save back the original transformation plane.
    8. Note: if you insert the dimension then I obtained an exception. I don’t think you need to insert dimensions when working on drawings.
    9. Note 2: if you forget to save the transformation plane back to the original, then you will find that you dimensions will go wacky, next time you run the command. Always remember to leave things as you found them!
    10. Note 3: You have to have the beam in the same plane as your view otherwise it won’t draw the dimension.


    Here is the code for your benefit:


  • Stair Outline Routine (AutoCAD .net + Code attached)

    An example of the type of stairs we draw. We do a lot of stairs. Both AS 1428 and AS 1657 compliant stairs.
    An example of the type of stairs we draw. We do a lot of stairs. Both AS 1428 and AS 1657 compliant stairs.


    We continue delving into our discussion of stairs. The boss hates it when I do things like this – releasing code to the public. But it’s too good not to share. Below is a routine you might find useful. We use it to model stairs – it’s super fast, and efficient. It allows us to try different things out and to discard what doesn’t work with ease. I’ve gone to the effort of drawing up an entire flight of stairs and then realised that I’m missing a tread. Then I’d have to redo the whole thing from the beginning. Once you have this outline done, the a good chunk of the work is finished.

    One of our many, many versatile routines:

    Here is a gif of the project:

    A Stair AutoCAD Plugin
    A plugin I wrote for AutoCAD. Written using c#.

    And here is the code for the benefit of study.

    I suppose I should refactor it, but I don’t think I’ll be changing it any time soon. So why worry?